Search
  • HOME
  • ABOUT ME
  • ARTICLES
Close
Menu
Search
Close
  • HOME
  • ABOUT ME
  • ARTICLES
Menu

Nina Knows Food

EXPLORE. EAT. DRINK. REPEAT.

July 8, 2018

The Instagram Poll Has Spoken: Spiced Beef Lettuce Wraps

by Nina Z


IMG-8833.jpg
IMG-8833.jpg

Me again, emerging from the heat wave that took over NYC last week and feeling motivated to spend time over a hot stove/in a hot little kitchen. After the most amazing day exploring Brighton Beach & Coney Island yesterday, all I wanted to do was bring back that fresh, summer feeling back into my meals. 

I took to Instagram to see what you wanted to see & eat—I offered one vegan option and one not-vegan option, and while the non-vegan option won, I'm still going to provide both recipes!

I'm not vegan—I've found that eating some quality meat & fish is best for my body & for feeling my best—but I do try to eat lots of plant-based meals during the week. But, not this week ;)

*Update July 2020: In an effort to use more inclusive language, I have removed some elements of this recipe including specifying the ingredient “grass-fed and finished beef.” This beef option may not be accessible for everyone, nor is it necessary to cook and enjoy this dish. I aim to have my recipes be accessible for everyone, no matter their access or lack thereof to certain ingredients. I also want to share that many of my recipes are inspired by Asian cuisines. I use many spices that originate in Asian cuisines - namely ginger, chilis, turmeric, coriander - and I am in awe of their versatility in so many different types of dishes. For this recipe in particular, I acknowledge that lettuce wraps are a common dish found in Chinese and Thai cuisines in particular, and my recipe is inspired by the many lettuce wraps I’ve eaten over the years. I will continue to review the recipes on this blog to make sure I am using inclusive language, both as it relates to the ingredients and how I was inspired to create the recipe.

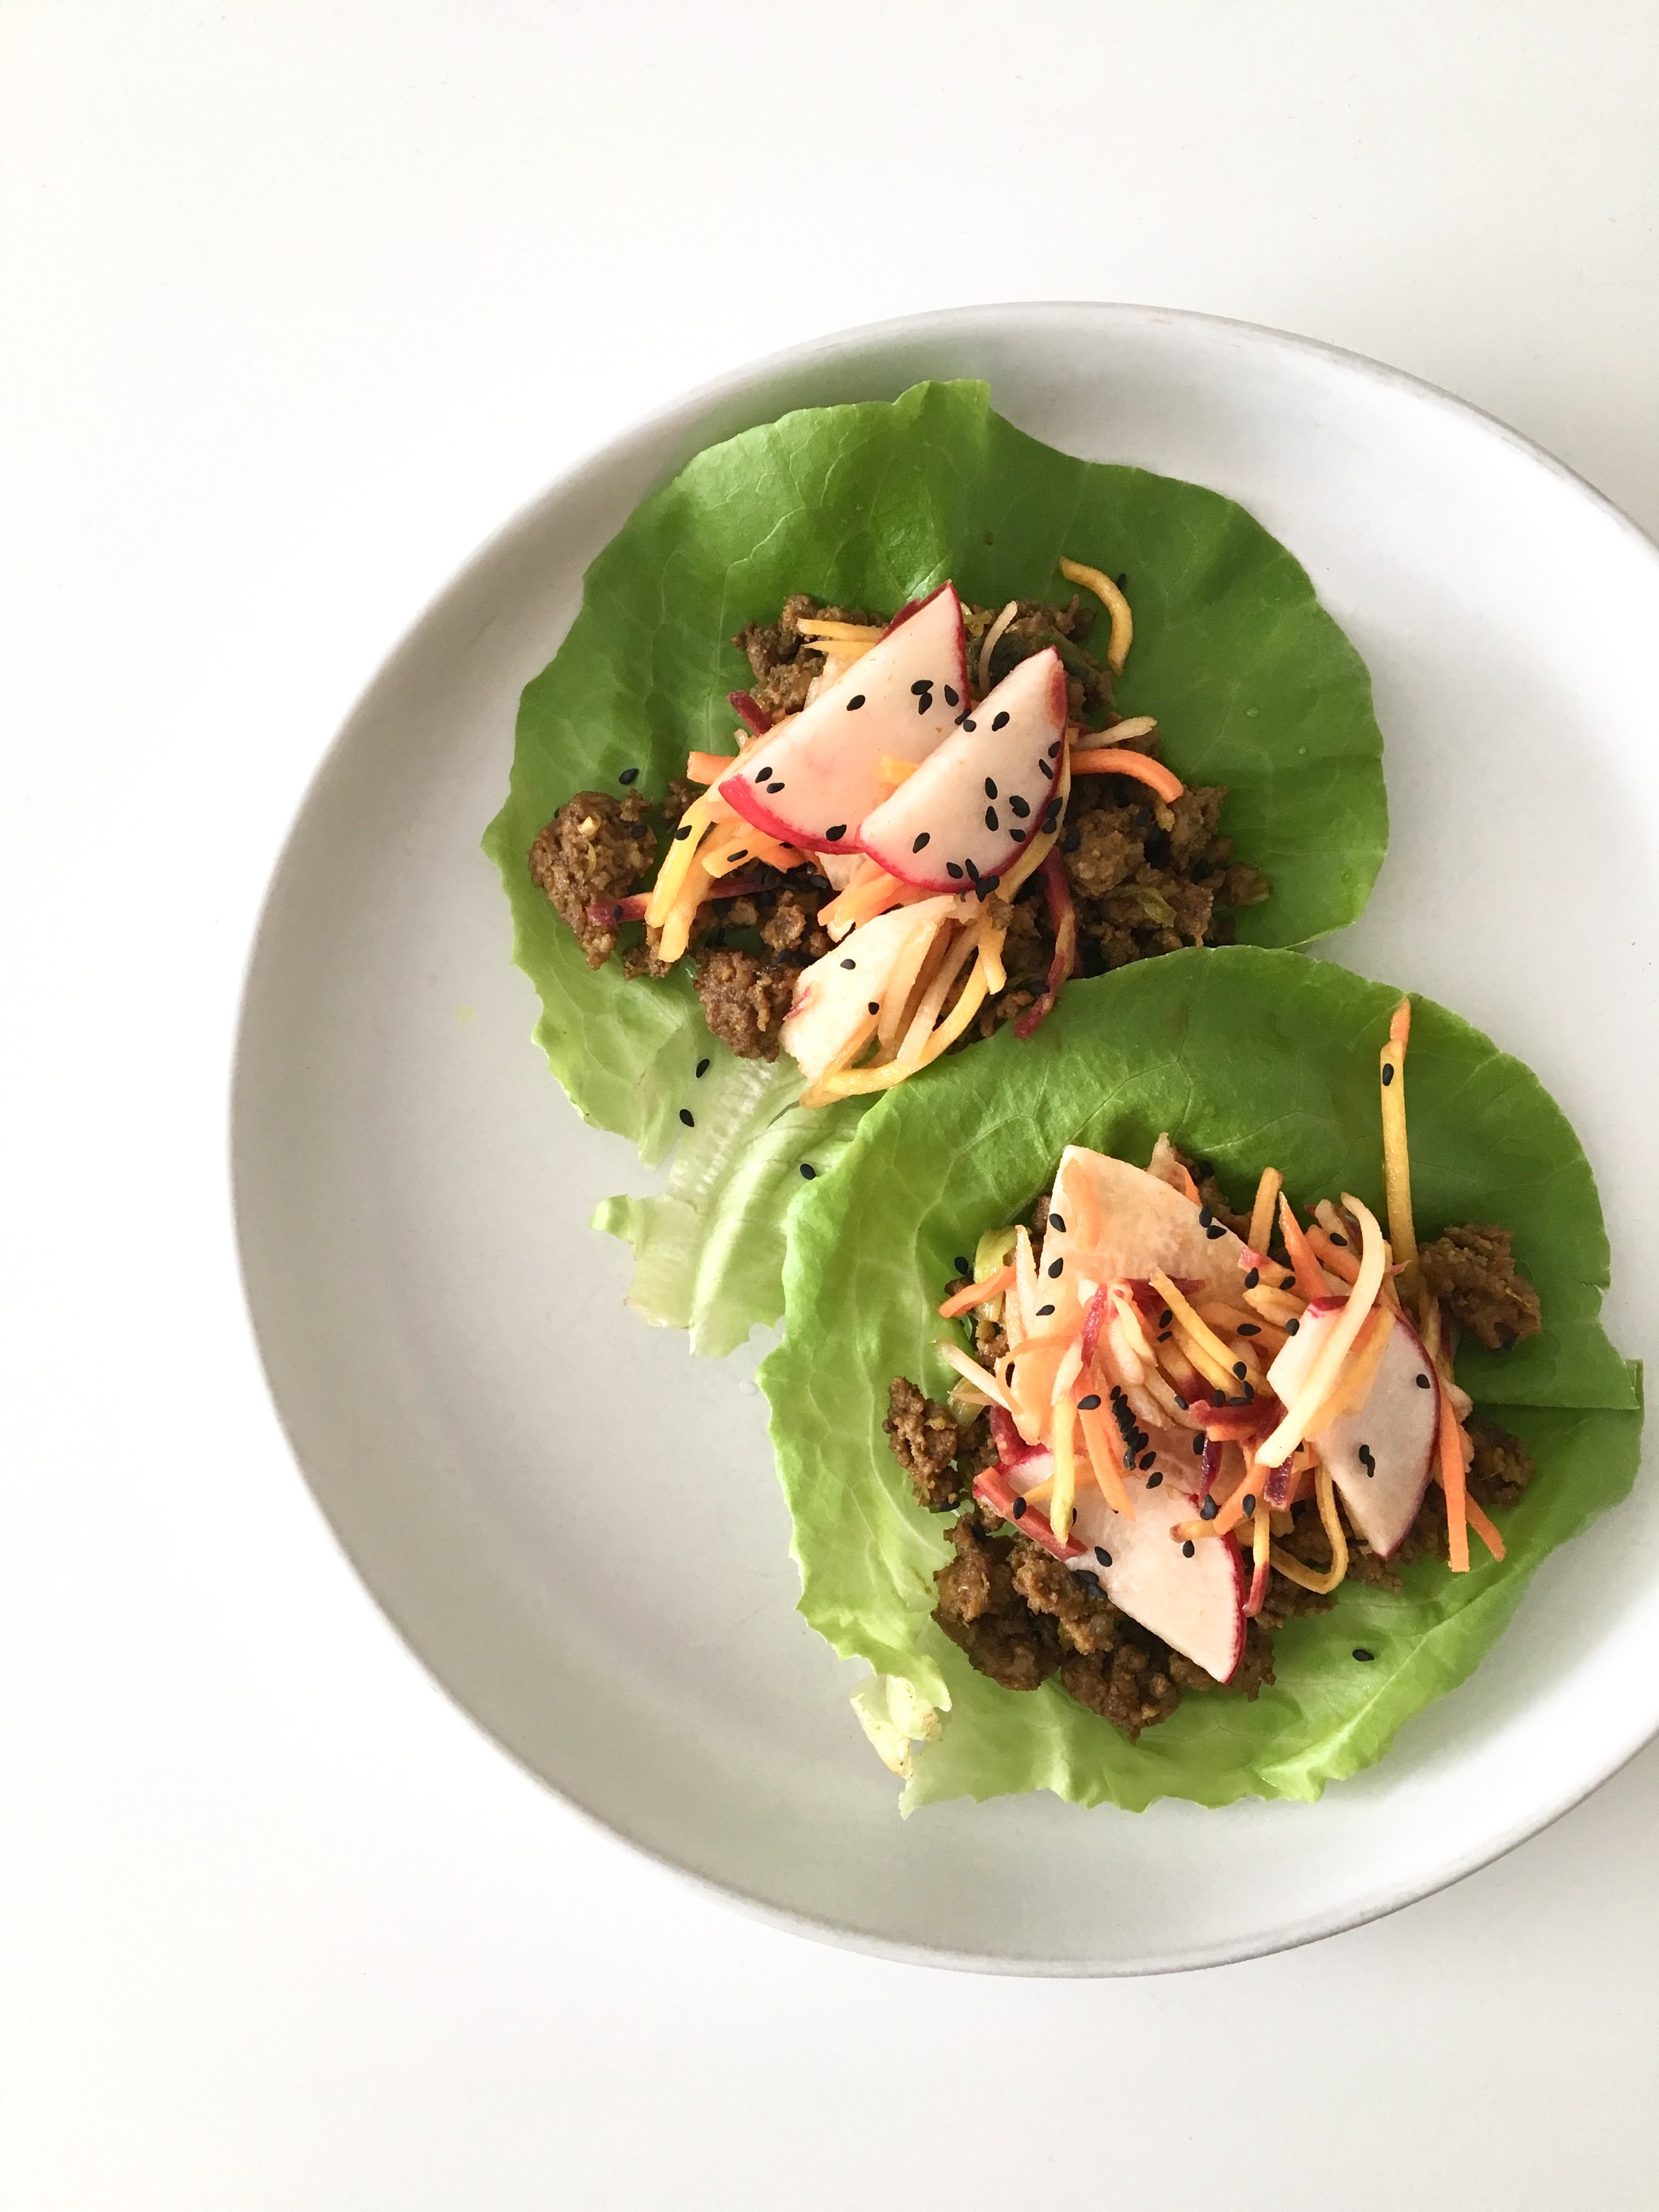
Here's what you'll need to make these beef lettuce wraps with sweet & spicy slaw:
[makes 3-4 servings, if you're measuring about 1/2 cup beef per person, or ~4oz]

Beef Filling:

  • 1 lb ground beef

  • 4-5 green onions, chopped

  • 1 garlic clove, chopped

  • 1 TBS coconut oil

  • 1/2 tsp ground coriander

  • 1/2 tsp ground turmeric

  • 1/4 tsp garlic powder

  • 1/4 tsp ground ginger

  • 1 tsp Sriracha [or more to taste]

  • Salt & pepper to taste

Sweet & Spicy Slaw Topping:

  • 1 cup shredded carrots [I bought pre-shredded, it's so much easier]

  • 1/2 cup thinly sliced jicama

  • 1-2 large radishes, thinly sliced

  • Juice of 1 small lime

  • 1 TBS tamari [or soy sauce]

  • 1 tsp Sriracha

  • 1 tsp maple syrup

Lettuce Wraps:

  • Romaine hearts or butterhead lettuce - these provide the “wrap” or “cup” to hold all the filling!

Method:

In a large sauté pan or skillet over low-medium heat, sauté green onions and garlic until soft, about 2-3 minutes. Add in ground beef, and break it up with your cooking spoon [I like to use wooden spoons] so that it can cook evenly in the pan.

Add in spices, Sriracha, and salt/pepper to taste, mixing it in with the beef to make sure it's thoroughly combined. Continue to break up the meat as it cooks. It will take about 10-15 minutes, depending on your stove top, to get the meat completely browned & cooked through. 

While the beef cooks, you can prepare the slaw ingredients. In a small mixing bowl, add in all slaw ingredients and toss with tongs or a spoon to coat evenly. Make sure you taste it—you can add more Sriracha or more maple syrup, depending on how spicy or sweet you like it!

When the beef is done cooking, turn off the stove and take the pan off the heat to let the mixture cool a bit [you can simply move the pan to another burner]. Rinse your lettuce and pat dry with a paper towel [no one likes a soggy wrap].

Lay down a couple of pieces of lettuce on your plate, fill with beef & top with slaw, and garnish with black sesame seeds or any other topping—you can try avocado, chopped cashews, or more Sriracha and tamari!

Hungry yet? Raise your hand if you can't wait for dinner tomorrow!

Comment

TAGS: ninaknowsfood, dinner, dairy-free, weeknightmeals, weekdaymeals, healthy meals, meal prep, recipedevelopment, howtoadultcookbook, gluten-free, eat local, sundays


April 25, 2018

Rainy Day? Ravenous? Ragu!

by Nina Z


IMG-8285.jpg
IMG-8285.jpg

I'm all about keeping things simple when it comes to cooking, and this dish is no exception. After a long day at work, all I wanted to do was curl up on my couch and binge How To Get Away With Murder (I wait 'til the full seasons are on Netflix, no spoilers!). It was also a Monday, and ugh, Mondays.

But sometimes, adulting requires you to do things you don't want to do, so I rolled up my sleeves and got into the kitchen. And it was soooo worth it! This ragu is quick—30 minutes, and I actually mean it—and is great over pasta, farro, or just some greens.

Here's what you'll need to make my Spicy Ragu (serves 1-2 for dinner, with leftovers):

  • 1 lb 80-20 ground beef ("80-20" refers to fat ratio; preferably grass-fed, grass-finished—healthier & better for the environment!)
  • 1 14oz can diced tomatoes
  • 2 large cloves garlic, finely chopped
  • 1 small shallot, finely chopped
  • 1 TBS red chili flakes (give or take, depending on your spice-tolerance)
  • 2 tsp each of fennel seeds, dried basil, oregano
  • 1 tsp smoked paprika
  • 1/4 cup white wine of your choice
  • Salt & pepper to taste
  • 1/4-1/2 water, if needed
  • Olive oil for the pan
  • 2 cups baby spinach
  • 1/2 cup peas, frozen or fresh

Instructions:

In a large saute pan (1-2 inches deep), heat olive oil over medium heat. Add garlic and shallot to the pan, and cook until soft, about 1-2 minutes.

Add ground beef and cook until just browned, about 5-7 minutes. If there's a lot of fat in the pan, you can scoop it out, but there shouldn't be too much if using 80-20 beef. Add in diced tomatoes, all spices, white wine, salt and pepper, and combine completely. Cover, lower heat to low-medium and let sauce simmer for 15-20 minutes. Stir once in the middle of this time, and add water to thin the sauce, if needed. You can also add wine instead, if you prefer!

After the sauce is done simmering, turn off the heat, and stir in spinach & peas. The spinach will wilt very quickly, and the peas will retain their firmness and color. Serve immediately, or let cool completely before storing to refrigerate/freeze.

Comment

TAGS: ninaknowsfood, howtoadultcookbook, dinner, weeknightmeals, weekdaymeals, meal prep, healthy meals, recipedevelopment


April 13, 2018

Black Sesame & Tahini Bread For The Win

by Nina Z


IMG-8239.jpg
IMG-8239.jpg

I'm probably not the only one whose Instagram feed is mostly food, and it's honestly where I get a lot of inspiration for weeknight meals, weekend baking projects, and all the snacks in between. 

I'm such a sucker for banana bread, but when I saw this swirled sesame tea cake... mind. blown. First, it's gorgeous. And second, it utilizes an ingredient that I usually have in my fridge but I almost never use!

Tahini is ground sesame, this beautiful light golden paste that's nutty and savory. It's also one of the main ingredients in hummus, giving it it's rich flavor.

If you've read any of my blog posts or Instagram posts, you know I'm impatient and can't be bothered with all the extra bowls & baking steps. And so, this version of this bread was born!

IMG-8237.jpg

Here's what you need to make my Black Sesame & Tahini Bread (makes one 8 1/2"x4 1/2" loaf):

Dry:

  • 1 1/2 cups whole wheat (or AP) flour
  • 1 3/4 tsp baking powder
  • 1/4 tsp baking soda
  • 1 tsp salt
  • 1/2 tsp each: cinnamon, nutmeg, ground ginger

Wet:

  • 1/2 cup coconut (or full fat Greek) yogurt
  • 1/2 cup tahini
  • 1 cup sugar, plus extra for sprinkling
  • 2 large eggs
  • 1 tsp vanilla extract
  • 1/2 cup olive oil
  • 1 1/2 tsp sesame oil

Other:

  • Black sesame seeds for sprinkling
  • Ghee (or nonstick oil spray) for pan

Instructions:

Preheat oven to 350 F. 

Coat bread loaf pan with nonstick oil spray OR thin layer of ghee. Then, line pan with parchment paper, so that paper comes up above the sides of the pan. Once more, coat parchment paper with nonstick spray OR thin layer of ghee. Sprinkle sesame seeds and sugar to coat parchment liner, tapping to evenly coat pan liner. 

In a large mixing bowl, whisk together all dry ingredients. In a small mixing bowl, combine yogurt and tahini. It might separate a little bit, but mix it until it's thoroughly combined. 

In another large mixing bowl, with a hand mixer (or standing mixer if you have one), beat sugar, eggs, and vanilla together until pale in color and thickened. Add in olive oil and sesame oil and beat until thoroughly combined.

Add dry ingredients and yogurt & tahini mixture alternately to the bowl with the wet ingredients (sugar, eggs, and vanilla)—dry, then yogurt & tahini mixture, then dry, then mixture, ending with dry.

Pour batter into the bread loaf pan, and sprinkle the top with more sesame seeds and sugar.

Bake for 55-65 minutes, until golden brown and no longer gooey in the center. Lift parchment & bread together out of the pan to allow to cool.

Serve warm topped with coconut yogurt & berries, or slathered with almond butter, or grab a slice straight out of the bread loaf pan (go ahead, no one's judging).


Adapted from bon appetit's swirled sesame tea cake.

Comment

TAGS: baking, ninaknowsfood, dairy-free, weekends, dessert, homemade, cooking, healthytreat, recipetesting, recipedevelopment, bonappetitmag


March 12, 2018

The Ultimate Breakfast Hack: Frozen Fruit Baked Oatmeal

by Nina Z


IMG_8064.JPG
IMG_8064.JPG

I try to buy local, in-season produce when I can, but last-minute plans and little energy after a long day of work and a post-work yoga class can easily sabotage my efforts to use fresh produce in the proper amount of time. While exaggerated, that meme of the avocado that's ripe at 6:00pm and rotten at 6:02pm explains my frustration of buying and using fresh produce, especially fruit!

Life hack? Stock up on frozen staples for future meal-prep ease! Buy frozen fruits like berries, and veggies like peas and broccoli florets. I love adding frozen berries to smoothies and frozen peas to any stew-like dish I make. Frozen produce helps make meal prep easier because you're not running to the grocery store for those select, fresh items. You'll save a little money too, as frozen produce can be purchased at any time during the year, and fresh, out-of-season produce is often quite expensive. 

By no means am I suggesting you replace all fresh fruits and vegetables with their frozen counterpart. Fresh produce, when locally grown and in-season, contains important vitamins & minerals to support health. However, if you're in the middle of a long winter, grabbing frozen produce can help save money and still add some of those vital nutrients into your diet, like vitamin C to ward off that pesky cold.

Here's what you need to make my Mixed Berry Baked Oatmeal (makes 4-6 large breakfast servings)

Wet:

  • 1 ripe medium banana
  • 2 cups frozen, mixed berries, split into 1 cup portions
  • 1/4 cup maple syrup
  • 1/2 cup almond milk (or nut milk of choice)
  • 1 teaspoon vanilla extract
  • 2 eggs

Dry:

  • 2 cups rolled oats
  • 1/2 cup coconut flour
  • 1/4 cup unsweetened shredded coconut
  • 1 teaspoon cinnamon
  • 1 teaspoon baking powder
  • 1/2 teaspoon sea salt

Instructions:

Preheat oven to 350 degrees F. Grease an 8x8 baking dish with ghee (you can also spray non-stick cooking oil) and set aside.

In a blender or food processor, puree banana, 1 cup frozen berries, maple syrup, almond milk, and vanilla until smooth. Pour into a large mixing bowl. Add eggs and whisk until thoroughly combined.

Add in all dry ingredients—oats, coconut flour, shredded coconut, cinnamon, baking powder, salt—and mix until thoroughly combined. Finally, add in remaining 1 cup of frozen berries and mix until they're evenly distributed throughout mixture.

Pour mixture into baking dish, making sure mixture is level. Bake for 35-40 minutes, until edges are slightly browned and middle is no longer soft—you can lightly touch top of oatmeal to determine if it's still "gooey" inside.

Serve immediately for a sweet snack, topped with coconut yogurt or a scoop of almond butter, or store in air-tight containers for your weekly breakfast meal prep. Oatmeal will last 3-5 days in the fridge.

Comment

TAGS: breakfast, oatmeal, weekdaymeals, howtoadultcookbook, dairy-free, gluten-free, frozen foods, ninaknowsfood, strawberries, blueberries, baked oatmeal, brunch, meal prep


November 19, 2017

A dish you may have grown up with...

by Nina Z


IMG_7455.JPG
IMG_7455.JPG

It's no secret that I get happier as the weather gets colder. Two weekends spent hiking in the Berkshires air kicked off my favorite season, filled with friends and lots of food.

fullsizeoutput_1d1f.jpeg

Sharing food with others is why I love to cook.

Thanksgiving is really the only holiday I get excited about cooking for—my mom and I plan the menu weeks in advance, wondering how we can tweak a dish from the previous year to make it better (healthier) or what should stay exactly the same.

This time of year, not only are we gearing up for our family Thanksgiving dinners, but Friendsgiving dinners as well. More often than not, Friendsgiving is potluck-style, giving you the chance to either showcase your mom's famous sweet potato casserole, or show how great you are at pointing at a babka from across the bakery counter.

fullsizeoutput_1cfb.jpeg

Chances are you've had some variation of sweet potatoes with marshmallows growing up. Perhaps you tried to scoop up only the toasted marshmallow topping. This dessert-as-sidedish conjures up extreme nostalgic feelings and in the spirit of the impending holiday, the #howtoadultcookbook ladies are here to give you a sweet twist to this classic Thanksgiving item.

Here's what you'll need to make Mini Sweet Potato Casseroles - makes 10-12 muffin-sized casseroles:

  • 4 large, or 5-6 medium-sized sweet potatoes—boiled, peeled & mashed
  • 1/4 cup coconut oil
  • 1/4 cup maple syrup
  • 1/2 tsp nutmeg
  • 1/2 tsp ground ginger
  • 1/2 tsp cinnamon
  • 1/2 tsp salt
  • mini marshmallows (for topping)
  • chopped pecans (for topping)

Place sweet potatoes in a large pot of water—water should be covering sweet potatoes fully, with 1-2 inches of water above potatoes. Bring water to boil and boil sweet potatoes for 30 minutes. Remove sweet potatoes from pot, and place in large mixing bowl to cool (about 20 minutes).

Preheat oven to 350F.

While still semi-warm, peel sweet potatoes, discarding the skin and placing peeled sweet potatoes back in the large mixing bowl. Mash sweet potatoes until smooth.

Add coconut oil, maple syrup, nutmeg, ground ginger, cinnamon, and salt and mix until thoroughly combined (the coconut oil will melt from warm potatoes).

In muffin tins lined with cupcake liners, fill each liner completely with sweet potato filling. Make a little hole in the middle of each for toppings.

Bake for 15 minutes until mini sweet potato casseroles are hot and slightly browned on top. Remove from oven to sprinkle each with a few mini marshmallows and chopped pecans—cover the top of each mini casserole almost fully (you should still be able to see potato underneath). Place back in the oven and bake for another 15 minutes until marshmallows are slightly browned on top.

Remove from oven to serve each mini casserole as an individual portion.

Tip: Be careful, they'll still be quite soft so you may need to use a spoon to remove them from muffin tins.

Comment

TAGS: friendsgiving, thanksgiving, dairy-free, gluten-free, comfortfood, howtoadultcookbook, dinner, homemade, cooking, holidays


June 21, 2017

No change, no growth.

by Nina Z


You may have heard the saying, hindsight is 20/20. And of course, it wouldn't be so clear if you didn't have time to reflect on it afterwards. That's exactly what I've been doing these past few months - reflecting - and ready to tackle whatever comes my way.

Let me start at the end of the story: the trip of a lifetime, the trip to cap off the first half of my year that had quite a few bumps in the road. SurfYogaBeer, you gave me exactly what I needed at exactly the right time - the universe is funny that way, you know? Amazing food, amazing views, and even more amazing people contributed to a blissed-out week where I was more present in every moment than I had been in months.

IMG_6475.JPG

Now, back to the real world, where I'm dealing with the ever-present reality of Saturn's return. Yep, Saturn's return, the period of time leading up to when Saturn returns to the same position it was on the day you were born. This period of time marks major transition as you move in to the next phase of your life. Think I'm crazy? Look it up!

What else has changed? A new job, a new apartment... just to name a couple. You may be thinking, Nina this is so much change at once! I don't disagree. It's a TON actually. If I've learned anything over the last few years, it's to be patient with myself, especially during these times of change. I tend to be very impatient and I often have to remind myself that it's going to take time. But I also remind myself that this is such an exciting time, with lots of beautiful and positive things to come.

So what remains true and consistent? My desire to keep up with this blog, and my love for cooking (of course). I've had to start meal prepping to bring lunch to my new job, which has been challenging but has allowed me to get more creative in the kitchen. I've been inspired by Food52's one-pot meals, like these curried coconut lentils. OH MY GOD, YUM. (Note: I added frozen peas and walnuts to mine). Meal prep has also allowed me to have a quick dinner without having to start cooking as soon as I get home. Win-win.

Oh, another thing that's going on? My dream of writing a COOKBOOK with my kickass friend Ilana is FINALLY COMING TRUE.

HELL YEAH, A COOKBOOK. A cookbook for us - the millenials - the ones realizing how incredibly valuable home cooking is and how important it is to have some basic skills, and absolutely delicious recipes, under our belts. We've been thinking about this for years and it's finally starting to happen. We only ask that you remain patient, as we're only at the beginning of planning, which happens to be the most fun... recipe development!

You wanna help test out recipes? Get in line.

Just kidding, there is no line. (Or is there?)

To give you a little taste of what's to come (see what I did there?), I'm going to share an exclusive cookbook recipe with y'all! 

Here's what you'll need to make GRAB-n-GO Protein Balls (makes 10-12, two-bite balls):

  • 1 large banana, mashed
  • ⅓ cup almond butter or peanut butter
  • ¾ cup rolled oats (not quick cook!)
  • 1 TBS maple syrup
  • 1 TBS hemp seeds
  • ½ tsp cinnamon
  • 1 TBS dried goji berries (or cranberries, or blueberries)
  • 1 TBS semi sweet or dark chocolate chips, slightly chopped (leave some full pieces)
  • 1 ½ TBS unsweetened coconut flakes (mix in) + 1 cup flakes (reserved for rolling)
  • Pinch of sea salt

Combine all ingredients in mixing bowl. Set aside baking sheet lined with parchment paper.

On a large plate, pour 1 cup of unsweetened coconut flakes. Using a spoon, scoop mixture and roll into 1-inch balls (about 1 TBS worth of mixture). Coat each protein ball with coconut flakes and place on baking sheet. Repeat until mixture is gone.

Refrigerate protein balls for at least 30 minutes; overnight is best. You can also freeze; the texture/consistency won't change that much! Store in an airtight container - will last 3-5 days in the fridge, 1-2 weeks in the freezer.

This is THE perfect snack to grab if you're running late to work, or to pop right before a spin class. Or, just-because you're hungry and want something packed with protein, fiber, and healthier sugars. 

It's good to be back, in more ways than one. Ciao (for now)!

Comment

TAGS: ninaknowsfood, travel, italy, surfyogabeer, mealprep, cooking, cookbook, vegan, dairy-free, snack, healthytreat, balance, howtoadultcookbook, recipedevelopment, recipetesting, weeknightmeals


January 15, 2017

Cookies for breakfast, dessert, and anything in between!

by Nina Z


I don't make cookies often. Not only because I find them a bit tedious to make, but also because they tend to have a lot of sugar and require butter to get that perfect cookie-texture.

But, I'm always trying to find a great dairy-free cookie, and I think I've come close to one of my favorites.

What you'll need to make Chocolate Chunk Cookies - makes 20-30 cookies:

Dry ingredients:

  • 1 1/2 cups all-purpose flour
  • 1/2 cup rolled oats (not quick-cook)
  • 1/2 tsp baking soda
  • 1/2 tsp baking powder
  • 1/4 tsp salt

Wet ingredients:

  • 1/4 cup coconut oil, melted
  • 1/4 organic cane sugar
  • 1/4 maple syrup
  • 2 eggs
  • 1 tsp vanilla extract

Other:

  • 1/3 cup chopped walnuts
  • 1/3 cup chopped dark chocolate bar of your choice (I used sea salt + almond) - I looove using bars instead of chips because you tend to get larger pieces of chocolate and you can add a variety of flavor to whatever you're making!

In a medium mixing bowl, thoroughly combine dry ingredients: flour, oats, baking soda, baking powder, and salt. In a separate medium mixing bowl, whisk together wet ingredients: coconut oil, sugar, maple syrup, eggs, and vanilla.

Slowly add dry ingredients to wet ingredients, using a spatula to make sure all dry ingredients are incorporated into the wet. You'll get a sticky, caramel-colored dough. Fold in walnuts and chocolate chunks. Cover the bowl and set aside on the counter for 10-15 minutes - this will allow dough to come together and not be as sticky when you form the cookies! At this point, preheat the oven to 350 degrees F and line two baking sheets with parchment paper.

Using a TBS measure, scoop 1 TBS dough on to baking sheet and press down with your fingers to flatten into disc (tip: spray the TBS measure with non-stick cooking spray so the dough doesn't stick!). Repeat until you're out of dough. These cookies won't spread, so you can keep them pretty close together.

Bake for 15-18 minutes, until golden. Transfer to plate or cooling rack. Allow to cool completely before storing, or be like me and grab one hot out of the oven and pretend you don't burn your mouth...

Sit back and treat yourself this Sunday with a large mug of coffee and one of these delicious cookies!

Comment

TAGS: dairy-free, cookies, sundays, dessert, homemade, comfortfood, weekends, everythinginmoderation, healthytreat


November 5, 2016

Chili Coincidence

by Nina Z


I know I'm a creature of habit, but exactly one year ago, I posted about chili. Coincidence? Destiny? Whatever it is, it's delicious.

I had every intention of making this chili recipe the same way I always have. I relied on memory to make my shopping list for items I knew I didn't have, which included switching up the key ingredient. I've always used ground turkey, but decided to go with something heartier: organic, grass fed ground beef.

As I sipped my coffee and prepped my kitchen for chili-making (as everyone does, right?), I realized my memory failed me. I forgot a 29oz can of tomatoes! And carrots! And chiles in adobo sauce!

Turns out, this was my best chili yet.

What you'll need to make my new and improved chili:

  • 1-1.15 lb organic grass fed ground beef
  • 1 14.5oz can diced fire roasted tomatoes
  • 1 14.5oz can diced tomatoes
  • 1 15oz can black beans, drained and rinsed
  • 1 15oz can red kidney beans, drained and rinsed
  • 1/2 cup frozen corn
  • 2 large red peppers, chopped
  • 1/2 white onion, diced
  • 2 cloves garlic, finely chopped
  • 4-6oz low sodium chicken broth (or broth of your choice; or water, if you don't have broth)
  • 1 tsp each: salt, pepper, cayenne, smoked paprika, & cumin

Cook ground beef in sauté pan until just browned. Drain excess fat before transferring beef to crockpot.

Prepare all other ingredients and add to crockpot. Cook on low for 6-7 hours. Serve with cornbread and toppings of your choice. If not serving right away, let cool completely before transferring to Tupperware to refrigerate/freeze.

So, now that you know this chili is even better than my last, there's no reason not to make it this weekend.

Seriously, it's chilly, eat some chili. 

Comment

TAGS: ninaknowsfood, chili, comfortfood, dinner, meat, fall, crockpot, weeknightmeals, weekends, homemade, cooking, slow-cooker


October 3, 2016

Gratitude

by Nina Z


A whole season has come and gone! At the beginning of my favorite season, I'm feeling grounded and ready to embrace Fall with an open mind.

If you've ever taken yoga, the instructor usually asks that you set an intention for your practice. I've decided to take that off the mat and set an intention for the rest of my year: gratitude. Even with a challenging transition at work, I've managed to take not one, not two, but three (!) mini vacations to see new places, spend time with amazing friends, and of course - eat great food. 

I'm incredibly grateful for the experiences I've had these past few months and I'm ready to tackle whatever comes my way this year, keeping this intention of gratitude in mind. 

As I get settled back in after my most recent vacation to Bermuda to celebrate 11 years of friendship, I'm excited to take advantage of all this season has to offer. Sweaters, boots, my favorite scarf with elephants on it, aaaand Fall foods: crockpot meals and sometimes bags of cider donuts.

Even though my lunch on a Saturday might consist of 1 (or 3) cider donuts, I also make sure to indulge in something healthy and comforting. I made this lentil stew for the first time over the summer, but it's much better suited for this dreary weather.

What you'll need to make Red Lentil Stew (makes 8-10 servings):

  • 2 TBS olive oil
  • 2 shallots, finely chopped
  • 2 cloves garlic, finely chopped
  • 2 large carrots, peeled and chopped
  • 2 cups red lentils
  • 1/2 10oz can diced tomatoes
  • 6 cups broth (your choice - vegetable or chicken)
  • 1/2 tsp turmeric
  • 1/2 tsp cumin
  • salt + pepper to taste
  • 2 cups spinach
  • Lime + Sriracha, for serving

In a large pot over medium-high heat, pour in olive oil and sauté shallots, garlic, and carrots until fragrant (4-5 minutes). Add in lentils, diced tomatoes, and spices, and stir to coat thoroughly. Add broth and bring to a rapid boil.

Once at a rapid boil, lower heat to low-medium, cover and simmer for 12-15 minutes, or until lentils are soft and tender. Add spinach and stir until wilted. Serve immediately with a small squeeze of lime and a little Sriracha. Let stew cool before storing/freezing.

Go make this stew now, or ASAP... I know you're busy, me too!

Here's to drinking hot coffee outside again without sweating, to hoping Mercury in Retrograde does not return any time soon (seriously though, a whole month was rough), and to feeling grateful.

Happy Fall!

Comment

TAGS: dinner, fall, vegetarian, weeknightmeals, leftovers, comfortfood, cooking, homemade, ninaknowsfood


April 6, 2016

I'm still here, I promise!

by Nina Z


I haven't forgotten about you, blog. There's just been so much going on - lots of work, lots of travel - but I'm here, and I want to share the last few months with you.

I started the new year with a quick trip to New Orleans, where I had some of the best meals of my life. We ate at some amazing restaurants, where I gave most of my hard-earned money to John Besh, and it was totally worth every penny. AND we got to experience my first ever Mardi Gras parade. Our daily activities were planned around our meals (I mean, eating is an activity in NOLA) and in between meals, we explored the French Quarter, the Warehouse Arts District, the Garden District, and lots in between. We decided that five days just wasn't enough, and we'll have to make our way back. 

After returning from NOLA, I ate as much green food as I could - a girl can only eat so many beignets and drink so many cups of chicory coffee. I brunched with friends, explored new parts of the city, and geared up for IIN's annual conference. 

IMG_4418.JPG

After months of planning, organizing, a weekend of 4:30am wake-up calls, and an overall extremely successful event, I was more than ready to escape for a long weekend.

IMG_4435.jpg

Miami was beautiful and my body was thrilled to finally experience sun and sand. Highlights included a delicious breakfast, beautiful cocktails, and a morning of solitude on the bay.

After a whirlwind past few months, it felt great to get back to my normal routine. More homemade meals was the goal, and the easier, the better.

Breakfast-for-dinner is a great go-to, whether it's breakfast tacos with scrambled eggs, leftover cabbage slaw, + homemade guacamole, or toasted whole wheat sourdough with almond butter, banana, chia seeds, hemp seeds, maple syrup + cinnamon.

Or, one-pot tofu coconut curry with light coconut cream, vegetable stock, tofu, + all the vegetables I could thrown in.

As I've said in a previous post, I'm continuously exploring my new home of BK (+ NYC). Even though I get to enjoy NOLA coffee here in my own apartment, I'm afraid I've caught the travel bug this year. I can't wait for my next non-local adventure!

Comment

TAGS: ninaknowsfood, travel, new orleans, nola, brunch, brooklyn, nyc, winter, breakfast, miami, jack's wife freda, homemade, eat local


  • Newer
  • Older

Powered by Squarespace 6