Search
  • HOME
  • ABOUT ME
  • ARTICLES
Close
Menu
Search
Close
  • HOME
  • ABOUT ME
  • ARTICLES
Menu

Nina Knows Food

EXPLORE. EAT. DRINK. REPEAT.

September 4, 2019

UPDATED: Spicy Beef Ragu

by Nina Z


fullsizeoutput_1e87.jpeg

Great recipes lend themselves to dishes that end up almost exactly the same each time. That’s my goal with the #howtoadultcookbook - to provide recipes that can be relied upon time and time again to create delicious meals.

In order to make that a reality, I’ve revisited every recipe in the book and made it again, and in the process, have adjusted some recipes, whether its ingredient amounts, cooking time, or cooking method(s). My hope is that you can depend on these recipes, while also making them your own in your own kitchens, in true #ninaknowsfood form.

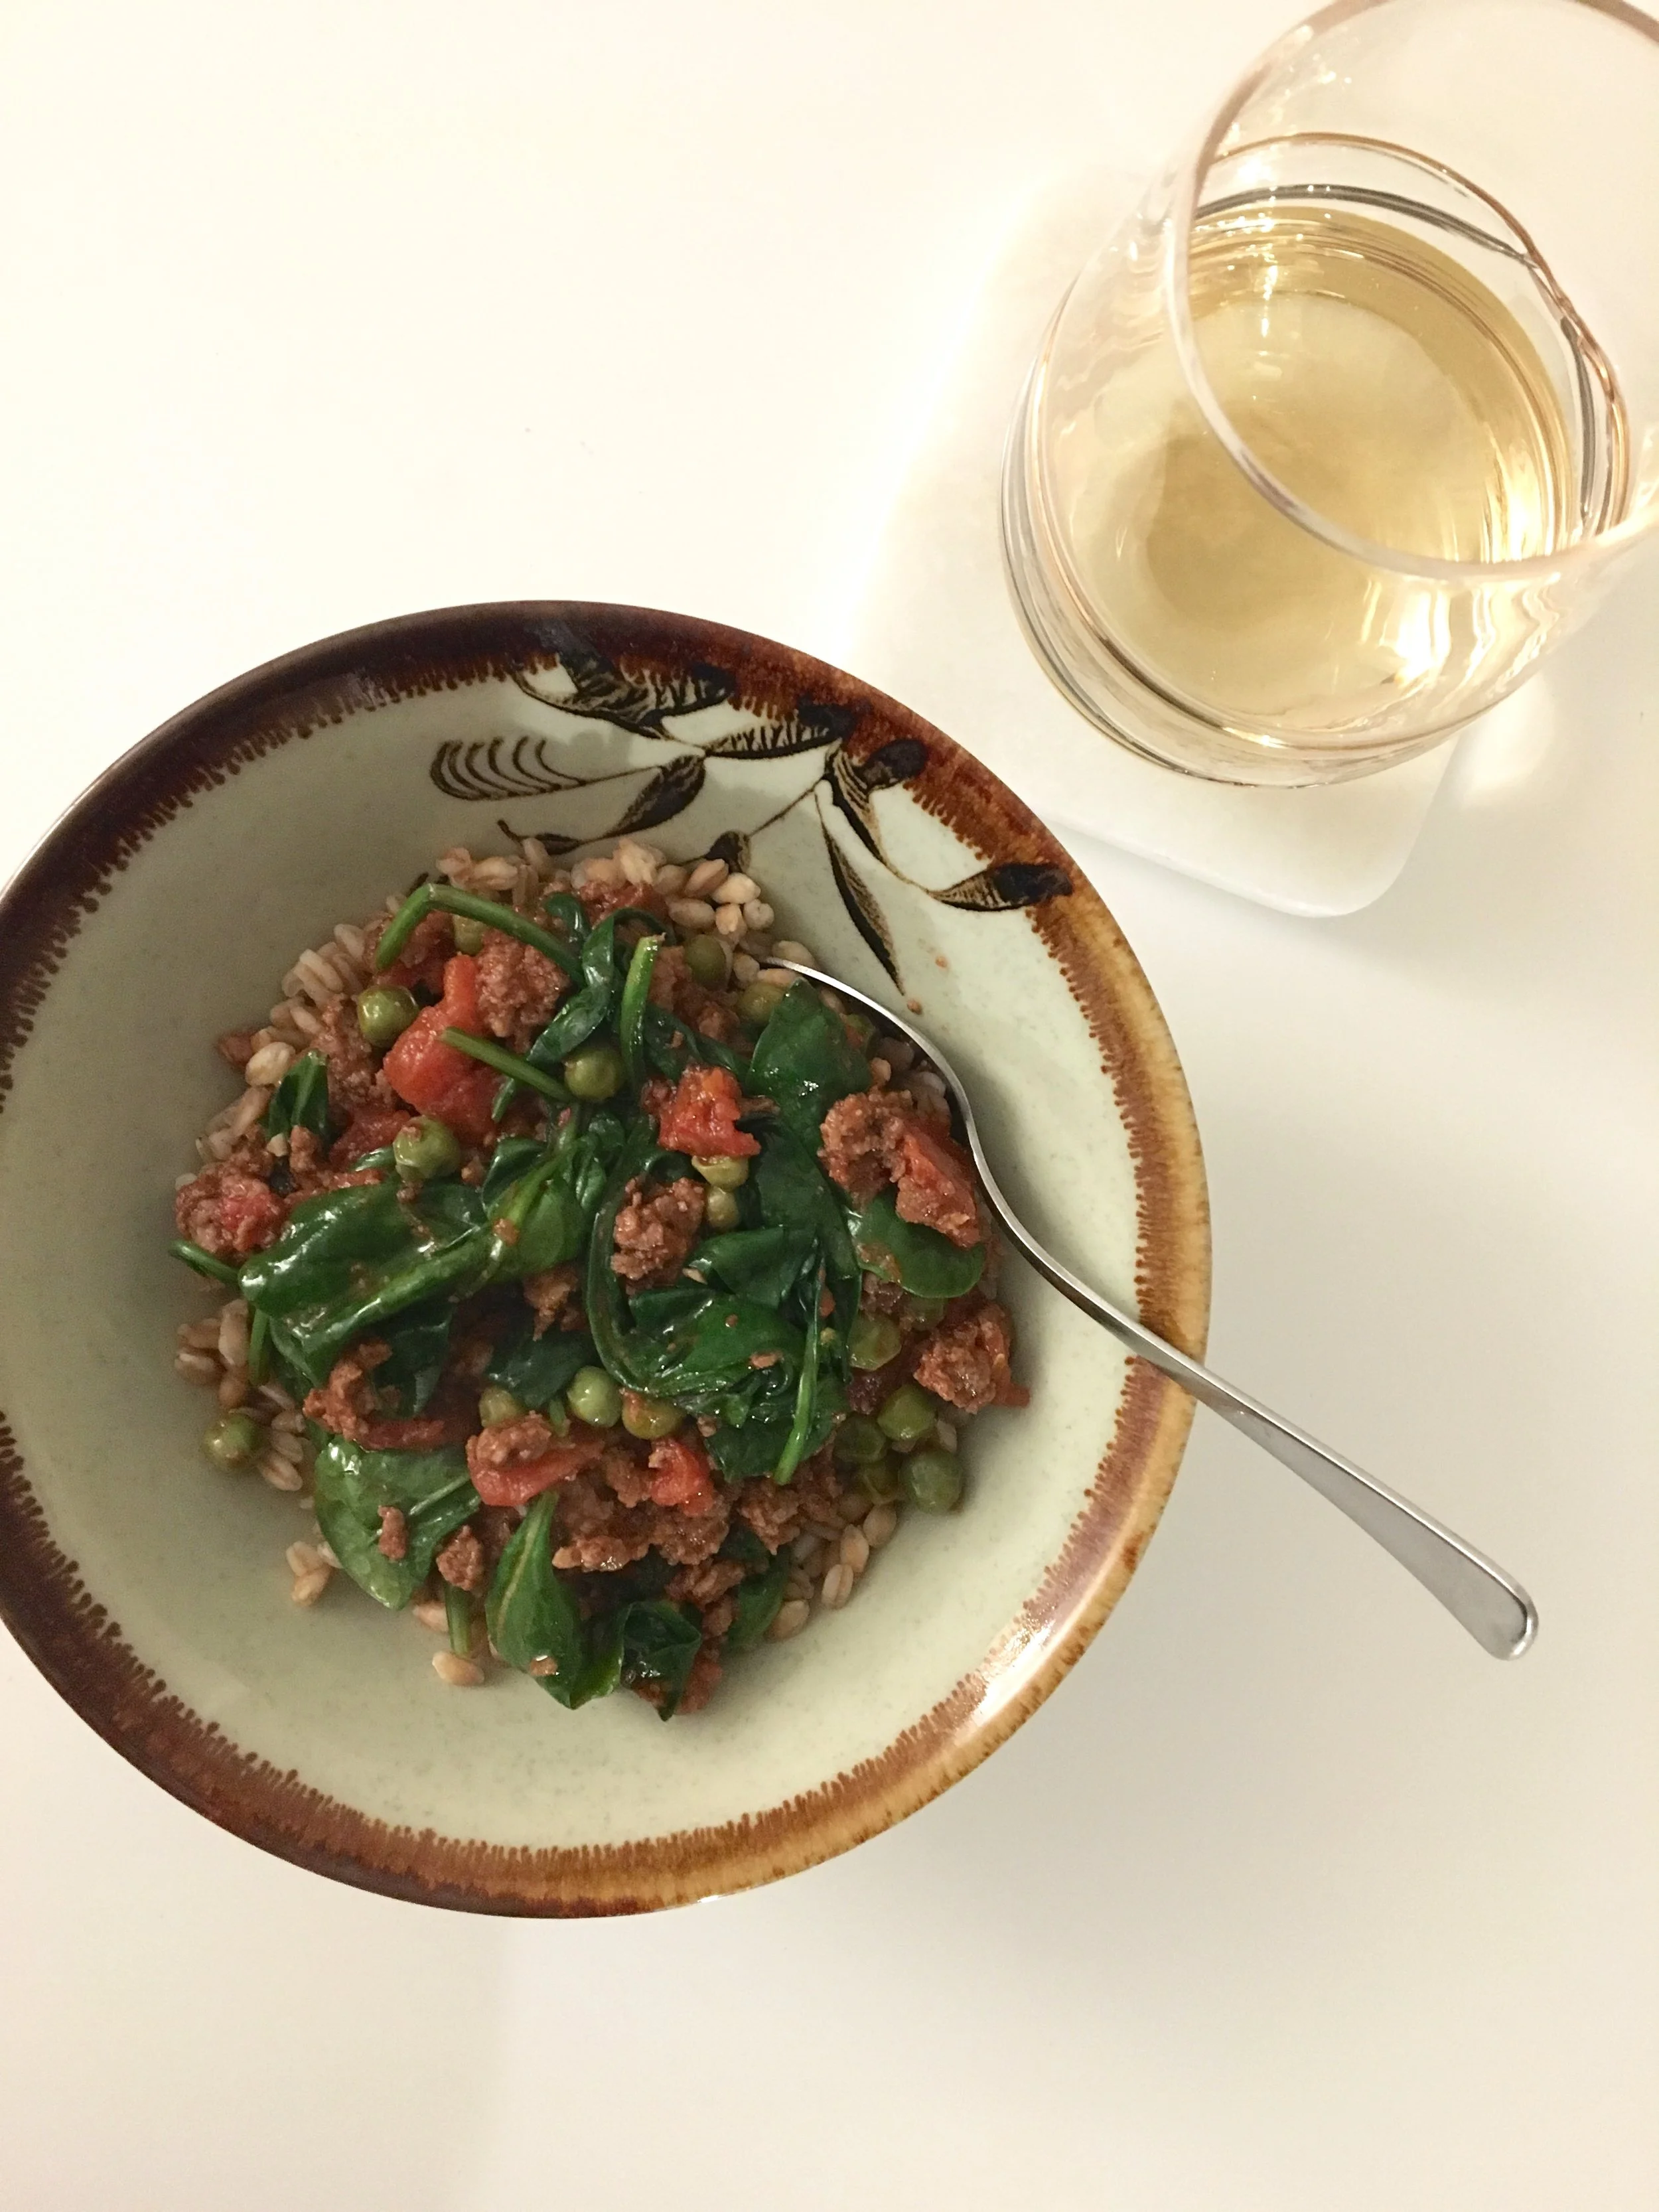
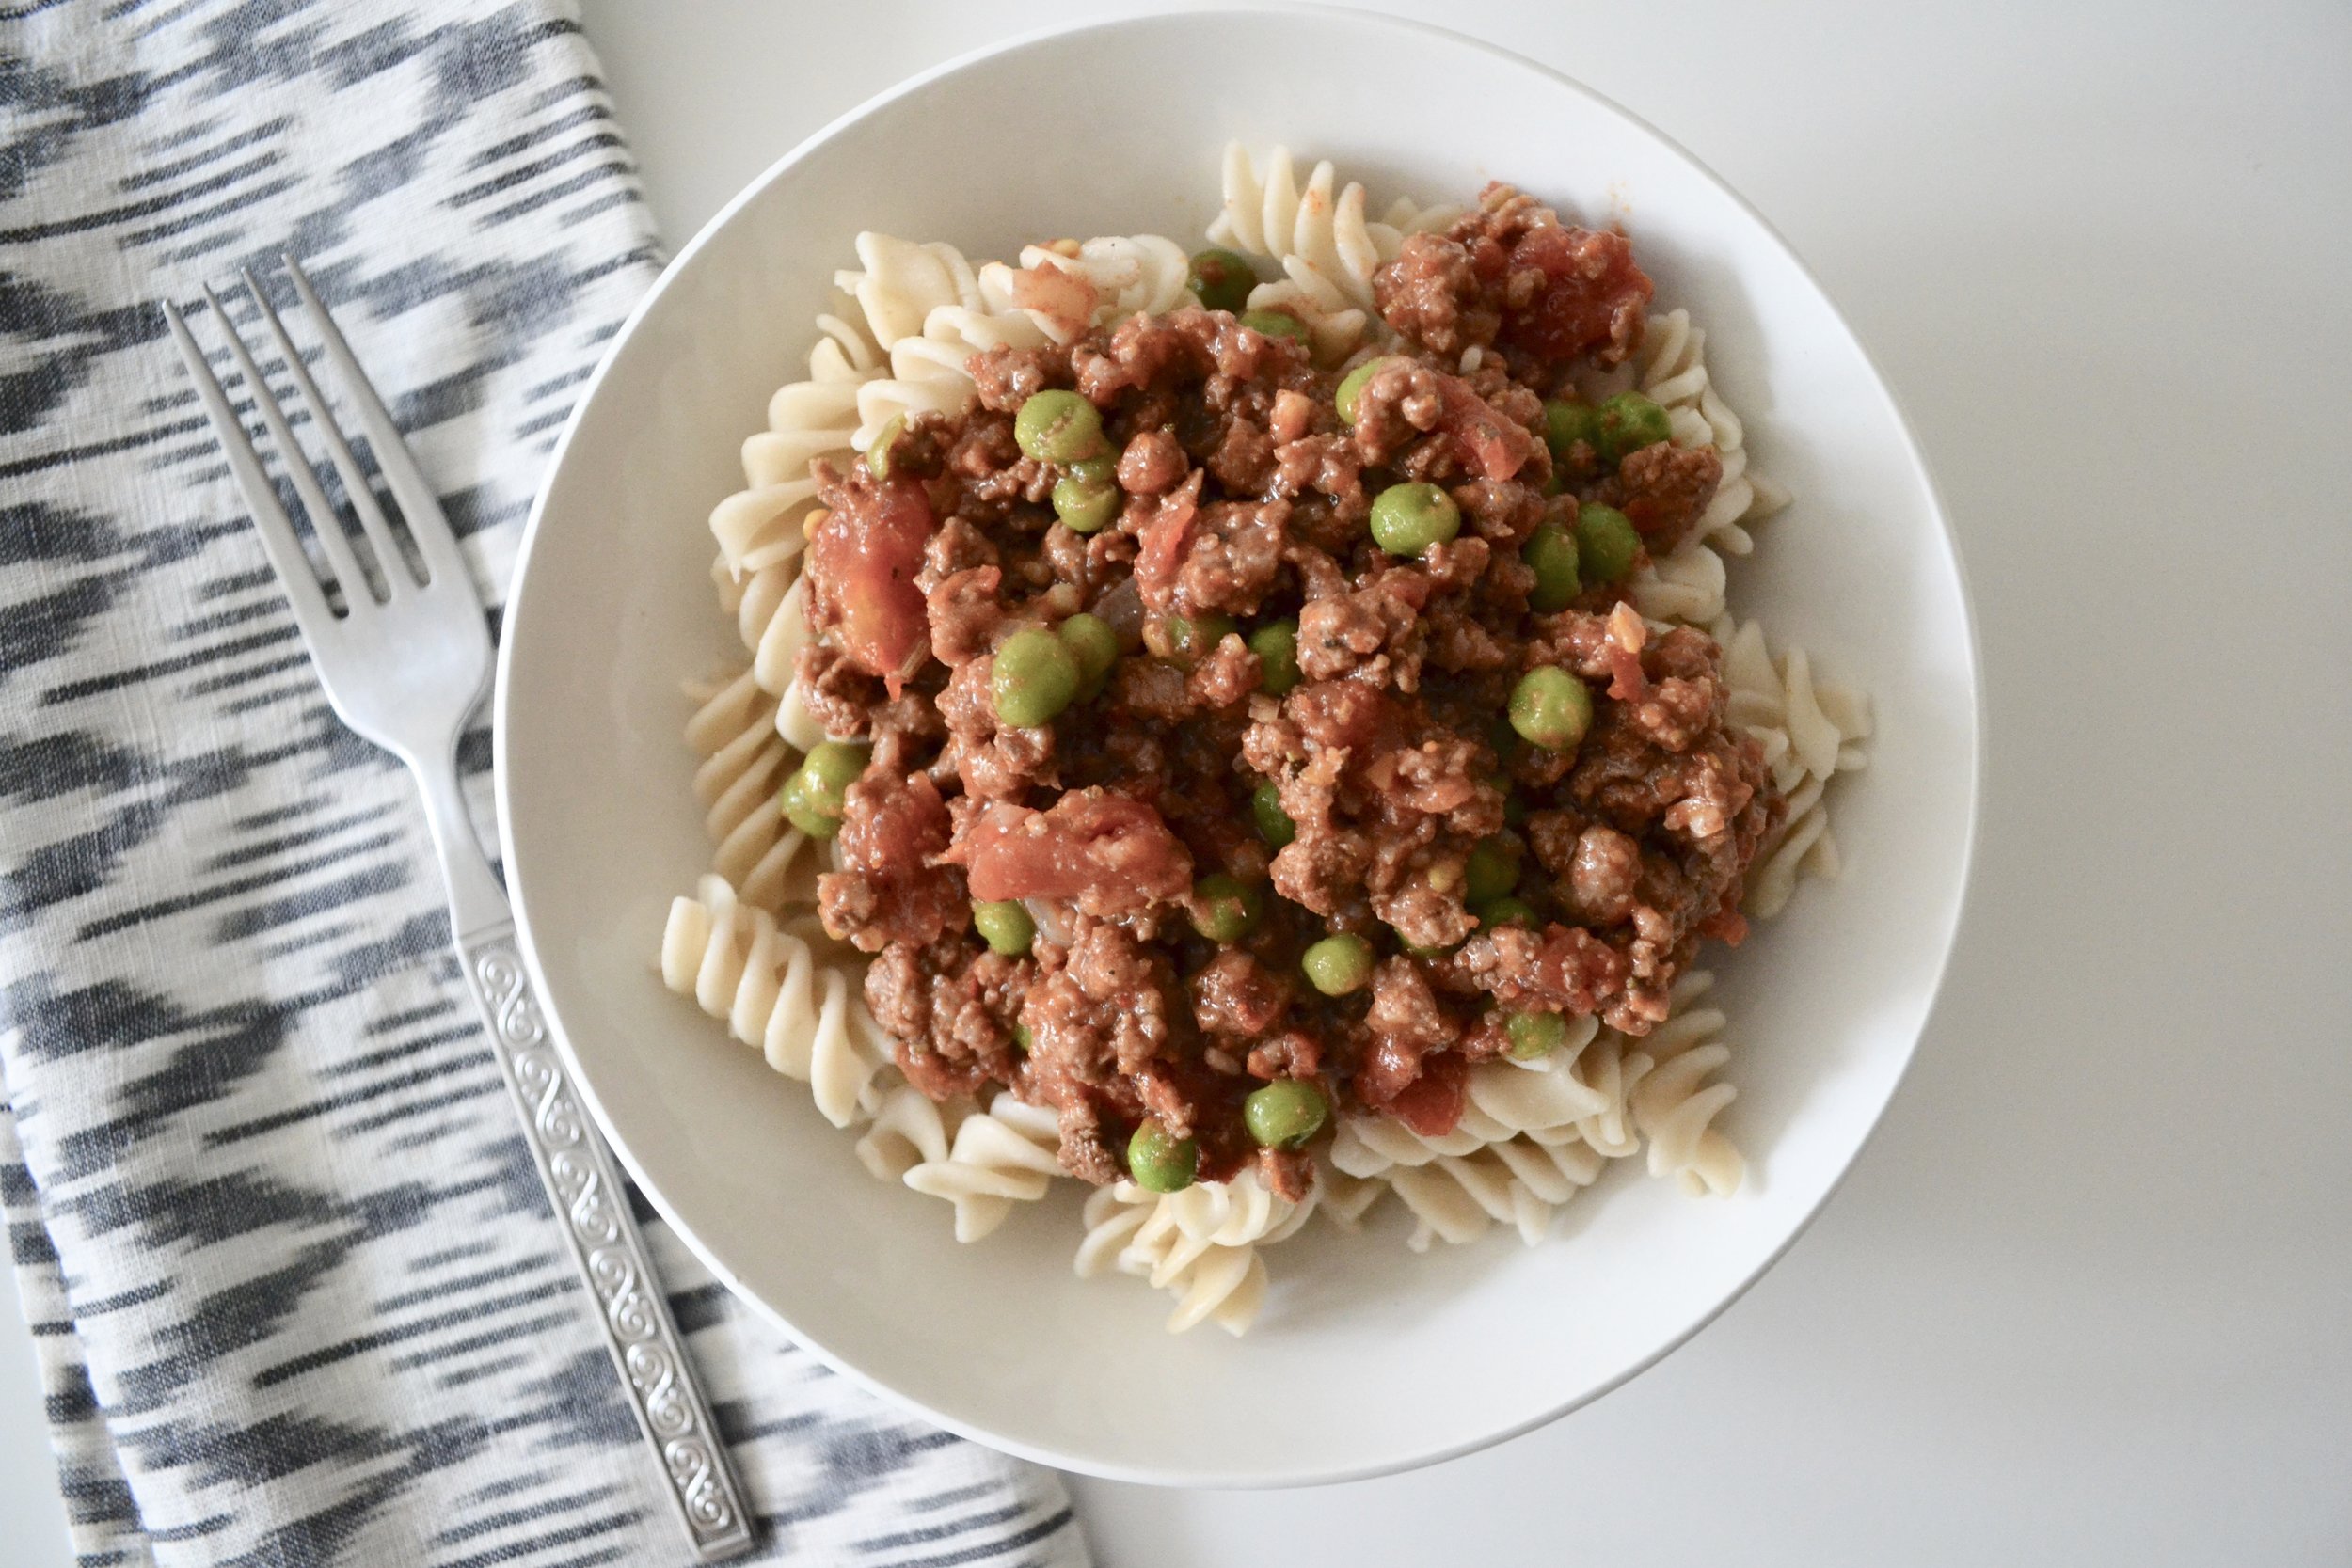
Here’s the updated spicy ragu recipe:

  • 2 TBS olive oil (for cooking)

  • 2 large cloves garlic, finely diced

  • 1 large shallot, finely diced

  • 1 lb ground beef (80/20 or 90/10)

  • 1/2 TBS red chili flakes

  • 2 tsp whole fennel seeds

  • 2 tsp ground Italian seasoning

  • 1 tsp ground smoked paprika

  • 1/4 cup white wine of your choice

  • 1 14oz can unseasoned diced tomatoes

  • 1/4 cup water

  • Salt & pepper to taste

  • 1/2 cup frozen peas

In a large sauté pan over low-medium heat, heat olive oil until shimmering. Add garlic and shallot, and cook until softened, about 2-3 minutes.

Add ground beef and cook until just browned. As meat is browning, add in red chili flakes, fennel seeds, Italian seasoning, and s&p. Stir to combine. If there's a lot of fat in the pan, remove with a spoon.

Once beef is browned, add in white wine and let liquid reduce by half. Once liquid reduces, add in diced tomatoes and water. Stir to combine completely.

Lower heat to low, cover, and allow ragu to simmer for 20 minutes.

When done simmering, turn off heat and take the pan off the hot burner. Add in frozen peas and stir to combine. The peas will thaw almost immediately.

Serve hot or let ragu cool completely before storing in the fridge or freezer.

Comment

TAGS: ninaknowsfood, howtoadultcookbook, cookbook, weeknightmeals, mealprep, meal prep, healthy meals, pasta, dinner


August 8, 2019

UPDATED: Tempeh Stir Fry, Scallion Pancakes & Peanut Ginger Sauce

by Nina Z


fullsizeoutput_1e67.jpeg

I’ve been thinking about these dishes since I posted them back in April because I wanted to be able to provide fully written out recipes, not just links to show you where my inspiration came from! I’ll definitely still do that, as I often find inspo from Instagram and the NYT Cooking section, but one of my goals with this blog is to be able to provide simpler, healthier versions of those dishes.

So, this post is just that. I revisited these dishes and made tweaks that I think will really help! I switched from using tofu to tempeh because I find tempeh easier to prepare & cook, and it’s also fermented soy, which my body handles better.

Also, this peanut sauce… you won’t be able to stop yourself from just eating it with a spoon and nothing else.

fullsizeoutput_1e62.jpeg

Scallion Pancakes:

  • 2 large eggs

  • 1/2 cup milk of your choice (if using nut milk, use unsweetened/unflavored)

  • 1 TBS low-sodium soy sauce or shoyu

  • 1 inch piece fresh ginger, chopped finely

  • 1 1/4 cup almond flour (or flour of choice)

  • 1/4 tsp baking powder

  • 1/2-1 bunch scallions, chopped (if you love scallions like me, you’ll use entire bunch!)

  • 1-2 TBS coconut oil, for cooking

Method for Scallion Pancakes:

Whisk eggs, milk, soy sauce and ginger together in a large mixing bowl. Add in flour, baking powder and scallions, and mix with a spatula until thoroughly combined.

Heat skillet over medium heat, and melt 1 TBS coconut oil to start. Using a 1/3 cup measure, scoop pancake batter onto skillet. Cook for 2-3 minutes on one side, and flip. You’ll know when it’s ready to flip because little bubbles will form on the edges of the pancakes. Repeat, and remove pancakes from skillet once cooked all the way through.

You may need to re-grease the pan, if your stovetop gets really hot, really quickly like mine does, so that’s why I included the extra 1 TBS of coconut oil in the ingredients.If you’re using 1/3 cup measure, you’ll be able to make 6-7 large pancakes. Totally up to you, but using a measuring cup ensures the same sized pancake every time!

Set aside with foil lightly covering until you’re ready to serve dinner.


Peanut Sauce (inspired by NYTCooking):

  • 3 TBS creamy peanut butter

  • 1 TBS rice wine vinegar

  • 3 tsp low-sodium soy sauce or shoyu

  • 3 tsp maple syrup

  • 1 tsp ground ginger

  • 1/4-1/3 cup water

  • 1 tsp Sriracha (optional)

Method for Peanut Sauce:

In a small mixing bowl, pour in peanut butter, vinegar, soy sauce, maple syrup, ground ginger, and optional Sriracha. Add in a little of the water, mix slowly with a spoon, and continue to add water until desired consistency, which should be thick but pourable. This makes enough to serve 2, with some for leftovers!

Set aside until you’re ready to serve.


Tempeh Stir Fry:

  • 1 package tempeh, cut into bite-size pieces

  • 1 package frozen stir fry veggies, thawed a little bit

  • 1 TBS sesame seeds

  • Salt to taste

  • 2 TBS coconut oil, for cooking

Method for Stir Fry:

In a large pan, heat coconut oil over medium heat.

Add tempeh to pan, and cook to brown on all sides, about 8-10 minutes. Add in veggies, sesame seeds and salt, and toss. Cook everything together for another 5-7 minutes, until veggies are cooked and a little browned. Depending on how hot your stovetop gets, this could take longer.

Serve stir fry, pancakes and peanut sauce together and enjoy a healthified takeout meal!

Comment

TAGS: ninaknowsfood, dinner, healthy meals, weekdaymeals, weeknightmeals, gluten-free, dairy-free, mealprep, meal prep, takeout, healthy takeout, grain-free


March 11, 2019

How To Make Meal Prep Not Suck

by Nina Z


B734D76D-1C62-40EF-B6CE-E80F83FA5BDD.JPG

A friend and I were recently talking about how we feel like all we do at the backend of the week is grocery shop, cook, and clean. We were swapping stories over how often we clean our bathrooms and how we feel like our food never lasts long enough in the fridge.

This concept of “adulting,” made popular by millenials, can be cheeky and used to poke fun at my generation that feels personally victimized by simple life responsibilities. However, if you haven’t read this article about millennial burnout yet, go read that and come back to this after.

With that being said, I’m all “how-to-adult” in the best way possible, always thinking about I can maximize my time and effort. While I love to cook and have learned to find joy in the mise en place-ing of it all, it’s taken time to get here. However, I’m confident that I can inspire at least one person reading this post to shift how they think about meal prepping.

Let me back up and answer the question, why meal prep? At the most basic level, it takes the thought out of what you’re going to have for breakfast/lunch/dinner during the week, so you can focus on other important things: your partner, your job, your side hustle, your friends, your family.

It can save you money. Let’s do some quick math: if your sweetgreen salad costs $15, and you’re getting that salad for lunch every day, that’s $75/week. I spent $60 on my grocery shop this week (a lighter week, as I wasn’t stocking up on a lot of pantry staples), and it went into lunches and dinners for at least 4 days this week, plus some meals for the freezer, plus some fresh produce, as well as a few canned items that I will use for future dishes. That nets to less than $8/meal this week!

It can make you healthier. Meal prepping allows you to know exactly what’s going into your food and how it’s being prepared. This is game-changing. You can control the amount of oil, the amount of salt, adding everything you want and leaving out everything you don’t. Eating whole foods and a variety of these whole foods is key, and something I strive for during my meal prep.

OK, so what can you do to take the dread out of meal prep?

  1. It sounds simple, but, plan ahead - do your recipe research during the week! I love the NYT Cooking app and Instagram to find inspiration

    • Look for recipes that require one pot, which will always save time

    • Look for recipes that require stewing/simmering, which means you’ll be able to walk away while your dishes are cooking

    • I like to choose two recipes that require a lot of the same ingredients, but are different enough so that I won’t get bored during the week(s) of eating the same thing, e.g. my personal favorites right now: spiced chickpea stew and coconut curry lentil stew

    • Plan to freeze at least one or two containers of whatever you make so that your freezer will have a variety of items to choose from on weeks where you’re traveling or otherwise don’t have time to meal prep

  2. Make a very detailed grocery list - even down to the ounces or cups of dry ingredients you’ll need. You can buy in the bulk section of the grocery store to save money, not buy more than you actually need, and will save time during cooking as you’ll have the exact amount ready to go

  3. Spread your grocery shopping out over more than one day - avoid the Sunday scaries! You can buy canned goods on Saturday on your way back from yoga, and grab fresh ingredients on Sunday after brunch with friends… less time in the store each time, less to carry each time

  4. Prepare your storage containers ahead of time - make sure you have enough to hold all of your delicious meal prep. Have them out and ready when you’re done cooking!

    • Label ahead of time, if you’re going to freeze some for later - I like to put the date it was frozen and what’s in the container

  5. On your meal prep day of choice, spend time doing your “mise en place,” which means prep all of your ingredients before you start cooking

    • May sound counterintuitive to spend more time before you get started, but it will ultimately 1) save time during the actual cooking process, and 2) allow you to focus on your recipe in the moment

  6. Clean up as much as possible while your dish(es) are cooking

  7. Meal prep isn’t just for dinner - expand your horizons and prep breakfast, too! I love making chia seed pudding (recipe below) for a grab-and-go nutrient packed breakfast for after a morning workout

  8. Shift your mindset - aside from all the physical prep you’re doing, do some emotional prep. Think, “I’m doing this because I have respect for my time this week, and I want to create delicious, healthy meals that will make me feel great inside & out.”

  9. Invite a helping hand - this will save time prepping your ingredients, plus it goes along with shifting your mindset to make meal prep into a desired activity rather than a chore

Chia Seed Pudding (1 Grab & Go Serving)

  • 3 TBS chia seeds

  • 1/3 - 1/2 cup milk of your choice (less milk = more thick pudding)

  • Mason jar with lid

  • Toppings of your choice - sliced banana, peanut butter, cinnamon

Pour chia seeds and milk into the mason jar, and secure lid. Shake until chia seeds are thoroughly shaken up with milk. Take off lid, add toppings of choice, re-seal lid and keep in fridge overnight.

Comment

TAGS: mealprep, meal prep, breakfast, lunch, dinner, cooking, howtoadultcookbook, chia seed pudding, ninaknowsfood


July 12, 2018

Fiesta Tempeh Wraps (The Runner Up!)

by Nina Z


IMG-8841.jpg
IMG-8841.jpg

Remember that Instagram poll from last weekend? No? That's OK. I was having some serious takeout cravings but decided to take to the kitchen instead! The beef lettuce wraps won (see the previous post for those delightfully colorful morsels) but I want to help out my non-meat-eaters too!

Here's what you'll need to make my fiesta tempeh wraps [makes enough for a single meal & lots of leftovers!]:

Fillings:

  • 2 TBS olive oil (split; for the pan)
  • 1/2 red onion, chopped
  • 2 small zucchini squash, chopped
  • 1 clove garlic, diced finely
  • 1 tsp cumin, split
  • 1 tsp smoked paprika, split
  • Salt to taste
  • 1 8-ounce package unseasoned tempeh, sliced into 1/2-inch thick pieces (see picture for reference)
  • Refried black beans (I bought a 15-ounce can refried black beans and what I didn't use, I put into tupperware for meals during the week)

Toppings:

  • Sliced radish
  • Sliced avocado
  • Chopped cilantro
  • Sliced lime

Wraps:

  • Any kind you want! I used 2 Siete almond flour wraps per meal—you can find these at Whole Foods or small health food stores

Method:

In a large skillet or sauté pan over low-medium heat, heat 1 TBS olive oil. Add red onion, zucchini, garlic, 1/2 tsp cumin, 1/2 tsp paprika, and salt. Cook until the onion and zucchini are soft, about 5-7 minutes, depending on the strength of your burner. When the onion and zucchini mixture is cooked (soft and almost caramelized), transfer into a bowl and set aside. This makes about 1 1/2 cups cooked zucchini.

With the pan still over low-medium heat, add the remaining 1 TBS olive oil to the pan. Place tempeh slices in the pan, close to each other but not touching. If it doesn't all fit, no worries, you can repeat the cooking process with remaining tempeh.

Cook on one side for 3-4 minutes until browned, then with a pair of tongs, flip each slice over and cook on the other side for 3-4 minutes until browned. Add remaining 1/2 tsp each of cumin and smoked paprika, and salt to taste. When tempeh is browned on both sides, transfer to a plate and set aside. 

Now it's time to prepare the wraps! Place two wraps on a plate. Spread 1 TBS refried black beans on each wrap, leaving room around the edges. Add as much or as little zucchini mixture on to the wraps as you want, or you can have it on the side. Add 2-3 slices of tempeh to each wrap, and top with sliced radish, avocado, and cilantro. Squeeze wedge of lime over wraps to finish them off!

What's awesome about these wraps is having all of these different components that you can use to make different meals... try breakfast-for-dinner wraps with refried black beans, scrambled eggs, and zucchini; or a deconstructed taco salad with sliced tempeh, refried black beans, avocado, and radishes served over greens. The possibilities really are endless!

Comment

TAGS: ninaknowsfood, plant-based, vegan, dinner, healthy meals, meal prep, weeknightmeals, weekdaymeals, recipetesting, recipedevelopment, howtoadultcookbook, takeout


July 8, 2018

The Instagram Poll Has Spoken: Spiced Beef Lettuce Wraps

by Nina Z


IMG-8833.jpg
IMG-8833.jpg

Me again, emerging from the heat wave that took over NYC last week and feeling motivated to spend time over a hot stove/in a hot little kitchen. After the most amazing day exploring Brighton Beach & Coney Island yesterday, all I wanted to do was bring back that fresh, summer feeling back into my meals. 

I took to Instagram to see what you wanted to see & eat—I offered one vegan option and one not-vegan option, and while the non-vegan option won, I'm still going to provide both recipes!

I'm not vegan—I've found that eating some quality meat & fish is best for my body & for feeling my best—but I do try to eat lots of plant-based meals during the week. But, not this week ;)

*Update July 2020: In an effort to use more inclusive language, I have removed some elements of this recipe including specifying the ingredient “grass-fed and finished beef.” This beef option may not be accessible for everyone, nor is it necessary to cook and enjoy this dish. I aim to have my recipes be accessible for everyone, no matter their access or lack thereof to certain ingredients. I also want to share that many of my recipes are inspired by Asian cuisines. I use many spices that originate in Asian cuisines - namely ginger, chilis, turmeric, coriander - and I am in awe of their versatility in so many different types of dishes. For this recipe in particular, I acknowledge that lettuce wraps are a common dish found in Chinese and Thai cuisines in particular, and my recipe is inspired by the many lettuce wraps I’ve eaten over the years. I will continue to review the recipes on this blog to make sure I am using inclusive language, both as it relates to the ingredients and how I was inspired to create the recipe.

Here's what you'll need to make these beef lettuce wraps with sweet & spicy slaw:
[makes 3-4 servings, if you're measuring about 1/2 cup beef per person, or ~4oz]

Beef Filling:

  • 1 lb ground beef

  • 4-5 green onions, chopped

  • 1 garlic clove, chopped

  • 1 TBS coconut oil

  • 1/2 tsp ground coriander

  • 1/2 tsp ground turmeric

  • 1/4 tsp garlic powder

  • 1/4 tsp ground ginger

  • 1 tsp Sriracha [or more to taste]

  • Salt & pepper to taste

Sweet & Spicy Slaw Topping:

  • 1 cup shredded carrots [I bought pre-shredded, it's so much easier]

  • 1/2 cup thinly sliced jicama

  • 1-2 large radishes, thinly sliced

  • Juice of 1 small lime

  • 1 TBS tamari [or soy sauce]

  • 1 tsp Sriracha

  • 1 tsp maple syrup

Lettuce Wraps:

  • Romaine hearts or butterhead lettuce - these provide the “wrap” or “cup” to hold all the filling!

Method:

In a large sauté pan or skillet over low-medium heat, sauté green onions and garlic until soft, about 2-3 minutes. Add in ground beef, and break it up with your cooking spoon [I like to use wooden spoons] so that it can cook evenly in the pan.

Add in spices, Sriracha, and salt/pepper to taste, mixing it in with the beef to make sure it's thoroughly combined. Continue to break up the meat as it cooks. It will take about 10-15 minutes, depending on your stove top, to get the meat completely browned & cooked through. 

While the beef cooks, you can prepare the slaw ingredients. In a small mixing bowl, add in all slaw ingredients and toss with tongs or a spoon to coat evenly. Make sure you taste it—you can add more Sriracha or more maple syrup, depending on how spicy or sweet you like it!

When the beef is done cooking, turn off the stove and take the pan off the heat to let the mixture cool a bit [you can simply move the pan to another burner]. Rinse your lettuce and pat dry with a paper towel [no one likes a soggy wrap].

Lay down a couple of pieces of lettuce on your plate, fill with beef & top with slaw, and garnish with black sesame seeds or any other topping—you can try avocado, chopped cashews, or more Sriracha and tamari!

Hungry yet? Raise your hand if you can't wait for dinner tomorrow!

Comment

TAGS: ninaknowsfood, dinner, dairy-free, weeknightmeals, weekdaymeals, healthy meals, meal prep, recipedevelopment, howtoadultcookbook, gluten-free, eat local, sundays


April 25, 2018

Rainy Day? Ravenous? Ragu!

by Nina Z


IMG-8285.jpg
IMG-8285.jpg

I'm all about keeping things simple when it comes to cooking, and this dish is no exception. After a long day at work, all I wanted to do was curl up on my couch and binge How To Get Away With Murder (I wait 'til the full seasons are on Netflix, no spoilers!). It was also a Monday, and ugh, Mondays.

But sometimes, adulting requires you to do things you don't want to do, so I rolled up my sleeves and got into the kitchen. And it was soooo worth it! This ragu is quick—30 minutes, and I actually mean it—and is great over pasta, farro, or just some greens.

Here's what you'll need to make my Spicy Ragu (serves 1-2 for dinner, with leftovers):

  • 1 lb 80-20 ground beef ("80-20" refers to fat ratio; preferably grass-fed, grass-finished—healthier & better for the environment!)
  • 1 14oz can diced tomatoes
  • 2 large cloves garlic, finely chopped
  • 1 small shallot, finely chopped
  • 1 TBS red chili flakes (give or take, depending on your spice-tolerance)
  • 2 tsp each of fennel seeds, dried basil, oregano
  • 1 tsp smoked paprika
  • 1/4 cup white wine of your choice
  • Salt & pepper to taste
  • 1/4-1/2 water, if needed
  • Olive oil for the pan
  • 2 cups baby spinach
  • 1/2 cup peas, frozen or fresh

Instructions:

In a large saute pan (1-2 inches deep), heat olive oil over medium heat. Add garlic and shallot to the pan, and cook until soft, about 1-2 minutes.

Add ground beef and cook until just browned, about 5-7 minutes. If there's a lot of fat in the pan, you can scoop it out, but there shouldn't be too much if using 80-20 beef. Add in diced tomatoes, all spices, white wine, salt and pepper, and combine completely. Cover, lower heat to low-medium and let sauce simmer for 15-20 minutes. Stir once in the middle of this time, and add water to thin the sauce, if needed. You can also add wine instead, if you prefer!

After the sauce is done simmering, turn off the heat, and stir in spinach & peas. The spinach will wilt very quickly, and the peas will retain their firmness and color. Serve immediately, or let cool completely before storing to refrigerate/freeze.

Comment

TAGS: ninaknowsfood, howtoadultcookbook, dinner, weeknightmeals, weekdaymeals, meal prep, healthy meals, recipedevelopment


November 19, 2017

A dish you may have grown up with...

by Nina Z


IMG_7455.JPG
IMG_7455.JPG

It's no secret that I get happier as the weather gets colder. Two weekends spent hiking in the Berkshires air kicked off my favorite season, filled with friends and lots of food.

fullsizeoutput_1d1f.jpeg

Sharing food with others is why I love to cook.

Thanksgiving is really the only holiday I get excited about cooking for—my mom and I plan the menu weeks in advance, wondering how we can tweak a dish from the previous year to make it better (healthier) or what should stay exactly the same.

This time of year, not only are we gearing up for our family Thanksgiving dinners, but Friendsgiving dinners as well. More often than not, Friendsgiving is potluck-style, giving you the chance to either showcase your mom's famous sweet potato casserole, or show how great you are at pointing at a babka from across the bakery counter.

fullsizeoutput_1cfb.jpeg

Chances are you've had some variation of sweet potatoes with marshmallows growing up. Perhaps you tried to scoop up only the toasted marshmallow topping. This dessert-as-sidedish conjures up extreme nostalgic feelings and in the spirit of the impending holiday, the #howtoadultcookbook ladies are here to give you a sweet twist to this classic Thanksgiving item.

Here's what you'll need to make Mini Sweet Potato Casseroles - makes 10-12 muffin-sized casseroles:

  • 4 large, or 5-6 medium-sized sweet potatoes—boiled, peeled & mashed
  • 1/4 cup coconut oil
  • 1/4 cup maple syrup
  • 1/2 tsp nutmeg
  • 1/2 tsp ground ginger
  • 1/2 tsp cinnamon
  • 1/2 tsp salt
  • mini marshmallows (for topping)
  • chopped pecans (for topping)

Place sweet potatoes in a large pot of water—water should be covering sweet potatoes fully, with 1-2 inches of water above potatoes. Bring water to boil and boil sweet potatoes for 30 minutes. Remove sweet potatoes from pot, and place in large mixing bowl to cool (about 20 minutes).

Preheat oven to 350F.

While still semi-warm, peel sweet potatoes, discarding the skin and placing peeled sweet potatoes back in the large mixing bowl. Mash sweet potatoes until smooth.

Add coconut oil, maple syrup, nutmeg, ground ginger, cinnamon, and salt and mix until thoroughly combined (the coconut oil will melt from warm potatoes).

In muffin tins lined with cupcake liners, fill each liner completely with sweet potato filling. Make a little hole in the middle of each for toppings.

Bake for 15 minutes until mini sweet potato casseroles are hot and slightly browned on top. Remove from oven to sprinkle each with a few mini marshmallows and chopped pecans—cover the top of each mini casserole almost fully (you should still be able to see potato underneath). Place back in the oven and bake for another 15 minutes until marshmallows are slightly browned on top.

Remove from oven to serve each mini casserole as an individual portion.

Tip: Be careful, they'll still be quite soft so you may need to use a spoon to remove them from muffin tins.

Comment

TAGS: friendsgiving, thanksgiving, dairy-free, gluten-free, comfortfood, howtoadultcookbook, dinner, homemade, cooking, holidays


November 5, 2016

Chili Coincidence

by Nina Z


I know I'm a creature of habit, but exactly one year ago, I posted about chili. Coincidence? Destiny? Whatever it is, it's delicious.

I had every intention of making this chili recipe the same way I always have. I relied on memory to make my shopping list for items I knew I didn't have, which included switching up the key ingredient. I've always used ground turkey, but decided to go with something heartier: organic, grass fed ground beef.

As I sipped my coffee and prepped my kitchen for chili-making (as everyone does, right?), I realized my memory failed me. I forgot a 29oz can of tomatoes! And carrots! And chiles in adobo sauce!

Turns out, this was my best chili yet.

What you'll need to make my new and improved chili:

  • 1-1.15 lb organic grass fed ground beef
  • 1 14.5oz can diced fire roasted tomatoes
  • 1 14.5oz can diced tomatoes
  • 1 15oz can black beans, drained and rinsed
  • 1 15oz can red kidney beans, drained and rinsed
  • 1/2 cup frozen corn
  • 2 large red peppers, chopped
  • 1/2 white onion, diced
  • 2 cloves garlic, finely chopped
  • 4-6oz low sodium chicken broth (or broth of your choice; or water, if you don't have broth)
  • 1 tsp each: salt, pepper, cayenne, smoked paprika, & cumin

Cook ground beef in sauté pan until just browned. Drain excess fat before transferring beef to crockpot.

Prepare all other ingredients and add to crockpot. Cook on low for 6-7 hours. Serve with cornbread and toppings of your choice. If not serving right away, let cool completely before transferring to Tupperware to refrigerate/freeze.

So, now that you know this chili is even better than my last, there's no reason not to make it this weekend.

Seriously, it's chilly, eat some chili. 

Comment

TAGS: ninaknowsfood, chili, comfortfood, dinner, meat, fall, crockpot, weeknightmeals, weekends, homemade, cooking, slow-cooker


October 3, 2016

Gratitude

by Nina Z


A whole season has come and gone! At the beginning of my favorite season, I'm feeling grounded and ready to embrace Fall with an open mind.

If you've ever taken yoga, the instructor usually asks that you set an intention for your practice. I've decided to take that off the mat and set an intention for the rest of my year: gratitude. Even with a challenging transition at work, I've managed to take not one, not two, but three (!) mini vacations to see new places, spend time with amazing friends, and of course - eat great food. 

I'm incredibly grateful for the experiences I've had these past few months and I'm ready to tackle whatever comes my way this year, keeping this intention of gratitude in mind. 

As I get settled back in after my most recent vacation to Bermuda to celebrate 11 years of friendship, I'm excited to take advantage of all this season has to offer. Sweaters, boots, my favorite scarf with elephants on it, aaaand Fall foods: crockpot meals and sometimes bags of cider donuts.

Even though my lunch on a Saturday might consist of 1 (or 3) cider donuts, I also make sure to indulge in something healthy and comforting. I made this lentil stew for the first time over the summer, but it's much better suited for this dreary weather.

What you'll need to make Red Lentil Stew (makes 8-10 servings):

  • 2 TBS olive oil
  • 2 shallots, finely chopped
  • 2 cloves garlic, finely chopped
  • 2 large carrots, peeled and chopped
  • 2 cups red lentils
  • 1/2 10oz can diced tomatoes
  • 6 cups broth (your choice - vegetable or chicken)
  • 1/2 tsp turmeric
  • 1/2 tsp cumin
  • salt + pepper to taste
  • 2 cups spinach
  • Lime + Sriracha, for serving

In a large pot over medium-high heat, pour in olive oil and sauté shallots, garlic, and carrots until fragrant (4-5 minutes). Add in lentils, diced tomatoes, and spices, and stir to coat thoroughly. Add broth and bring to a rapid boil.

Once at a rapid boil, lower heat to low-medium, cover and simmer for 12-15 minutes, or until lentils are soft and tender. Add spinach and stir until wilted. Serve immediately with a small squeeze of lime and a little Sriracha. Let stew cool before storing/freezing.

Go make this stew now, or ASAP... I know you're busy, me too!

Here's to drinking hot coffee outside again without sweating, to hoping Mercury in Retrograde does not return any time soon (seriously though, a whole month was rough), and to feeling grateful.

Happy Fall!

Comment

TAGS: dinner, fall, vegetarian, weeknightmeals, leftovers, comfortfood, cooking, homemade, ninaknowsfood


November 6, 2015

'Tis the (Crockpot) Season

by Nina Z


We're well in to the Fall season, so that means it's time to dust off the crockpot. I have made this chili so many times, and not only have I memorized the recipe, but I've tried enough cornbread recipes to finally get it right!

After a long day of work, or a cold Saturday hike, or even a sick day, this chili and cornbread is the perfect comfort-food meal.

Here's what you'll need for the chili (makes about 8 cups):

  • 1 lb ground turkey, cooked until just browned
  • 1 29oz can tomato sauce (no salt or spices)
  • 1 15oz can diced tomatoes (no salt or spices)
  • 1 can black beans, drained and rinsed
  • 1 can red kidney beans, drained and rinsed
  • 1-2 large carrots, chopped
  • 1 red bell pepper, chopped
  • 1 yellow bell pepper, chopped
  • 1/2 cup corn (frozen or fresh)
  • 1-2 chiles in adobo sauce (add more or less depending on desired spicyness)
  • 1 clove garlic, chopped finely
  • 1 tsp cumin
  • 1 tsp chili powder
  • salt + pepper to taste

Add all ingredients to the crockpot and cook on low for 6-7 hours. THAT'S IT! Serve with cornbread (recipe below) and garnish with toppings of your choice; cheese, green onions, tortilla chips are some awesome options. To freeze for future use, cool the chili down completely before storing in air-tight containers.

Here's what you'll need for the cornbread (makes 9-12 pieces):

  • 1 cup cornmeal
  • 1 cup whole wheat flour (or flour of your choice)
  • 2 tsp baking powder
  • 1 cup almond milk (or non-dairy/dairy milk of your choice)
  • 1 egg
  • 1/3 cup corn (fresh or frozen)
  • 1/4 cup coconut oil, melted/liquid
  • 1/4 maple syrup
  • 2 tsp turmeric
  • 1/2 tsp salt

Preheat oven to 350 degrees F. Combine all ingredients in large mixing bowl and mix until thoroughly combined. Pour batter in to 8x8 baking dish and cook for 20-25 minutes until golden brown on top (you can increase temp to 375 degrees F for last 5-10 minutes for extra golden crust). 

Cheers to my favorite season and snuggling up in front of the fire (or maybe a fake fire on your TV) with a bowl of chili and a glass of red wine! 

Comment

TAGS: crockpot, dinner, dairy-free, comfortfood, winter, fall, homemade, slow-cooker, leftovers


  • Newer
  • Older

Powered by Squarespace 6