Search
  • HOME
  • ABOUT ME
  • ARTICLES
Close
Menu
Search
Close
  • HOME
  • ABOUT ME
  • ARTICLES
Menu

Nina Knows Food

EXPLORE. EAT. DRINK. REPEAT.

July 12, 2018

Fiesta Tempeh Wraps (The Runner Up!)

by Nina Z


IMG-8841.jpg
IMG-8841.jpg

Remember that Instagram poll from last weekend? No? That's OK. I was having some serious takeout cravings but decided to take to the kitchen instead! The beef lettuce wraps won (see the previous post for those delightfully colorful morsels) but I want to help out my non-meat-eaters too!

Here's what you'll need to make my fiesta tempeh wraps [makes enough for a single meal & lots of leftovers!]:

Fillings:

  • 2 TBS olive oil (split; for the pan)
  • 1/2 red onion, chopped
  • 2 small zucchini squash, chopped
  • 1 clove garlic, diced finely
  • 1 tsp cumin, split
  • 1 tsp smoked paprika, split
  • Salt to taste
  • 1 8-ounce package unseasoned tempeh, sliced into 1/2-inch thick pieces (see picture for reference)
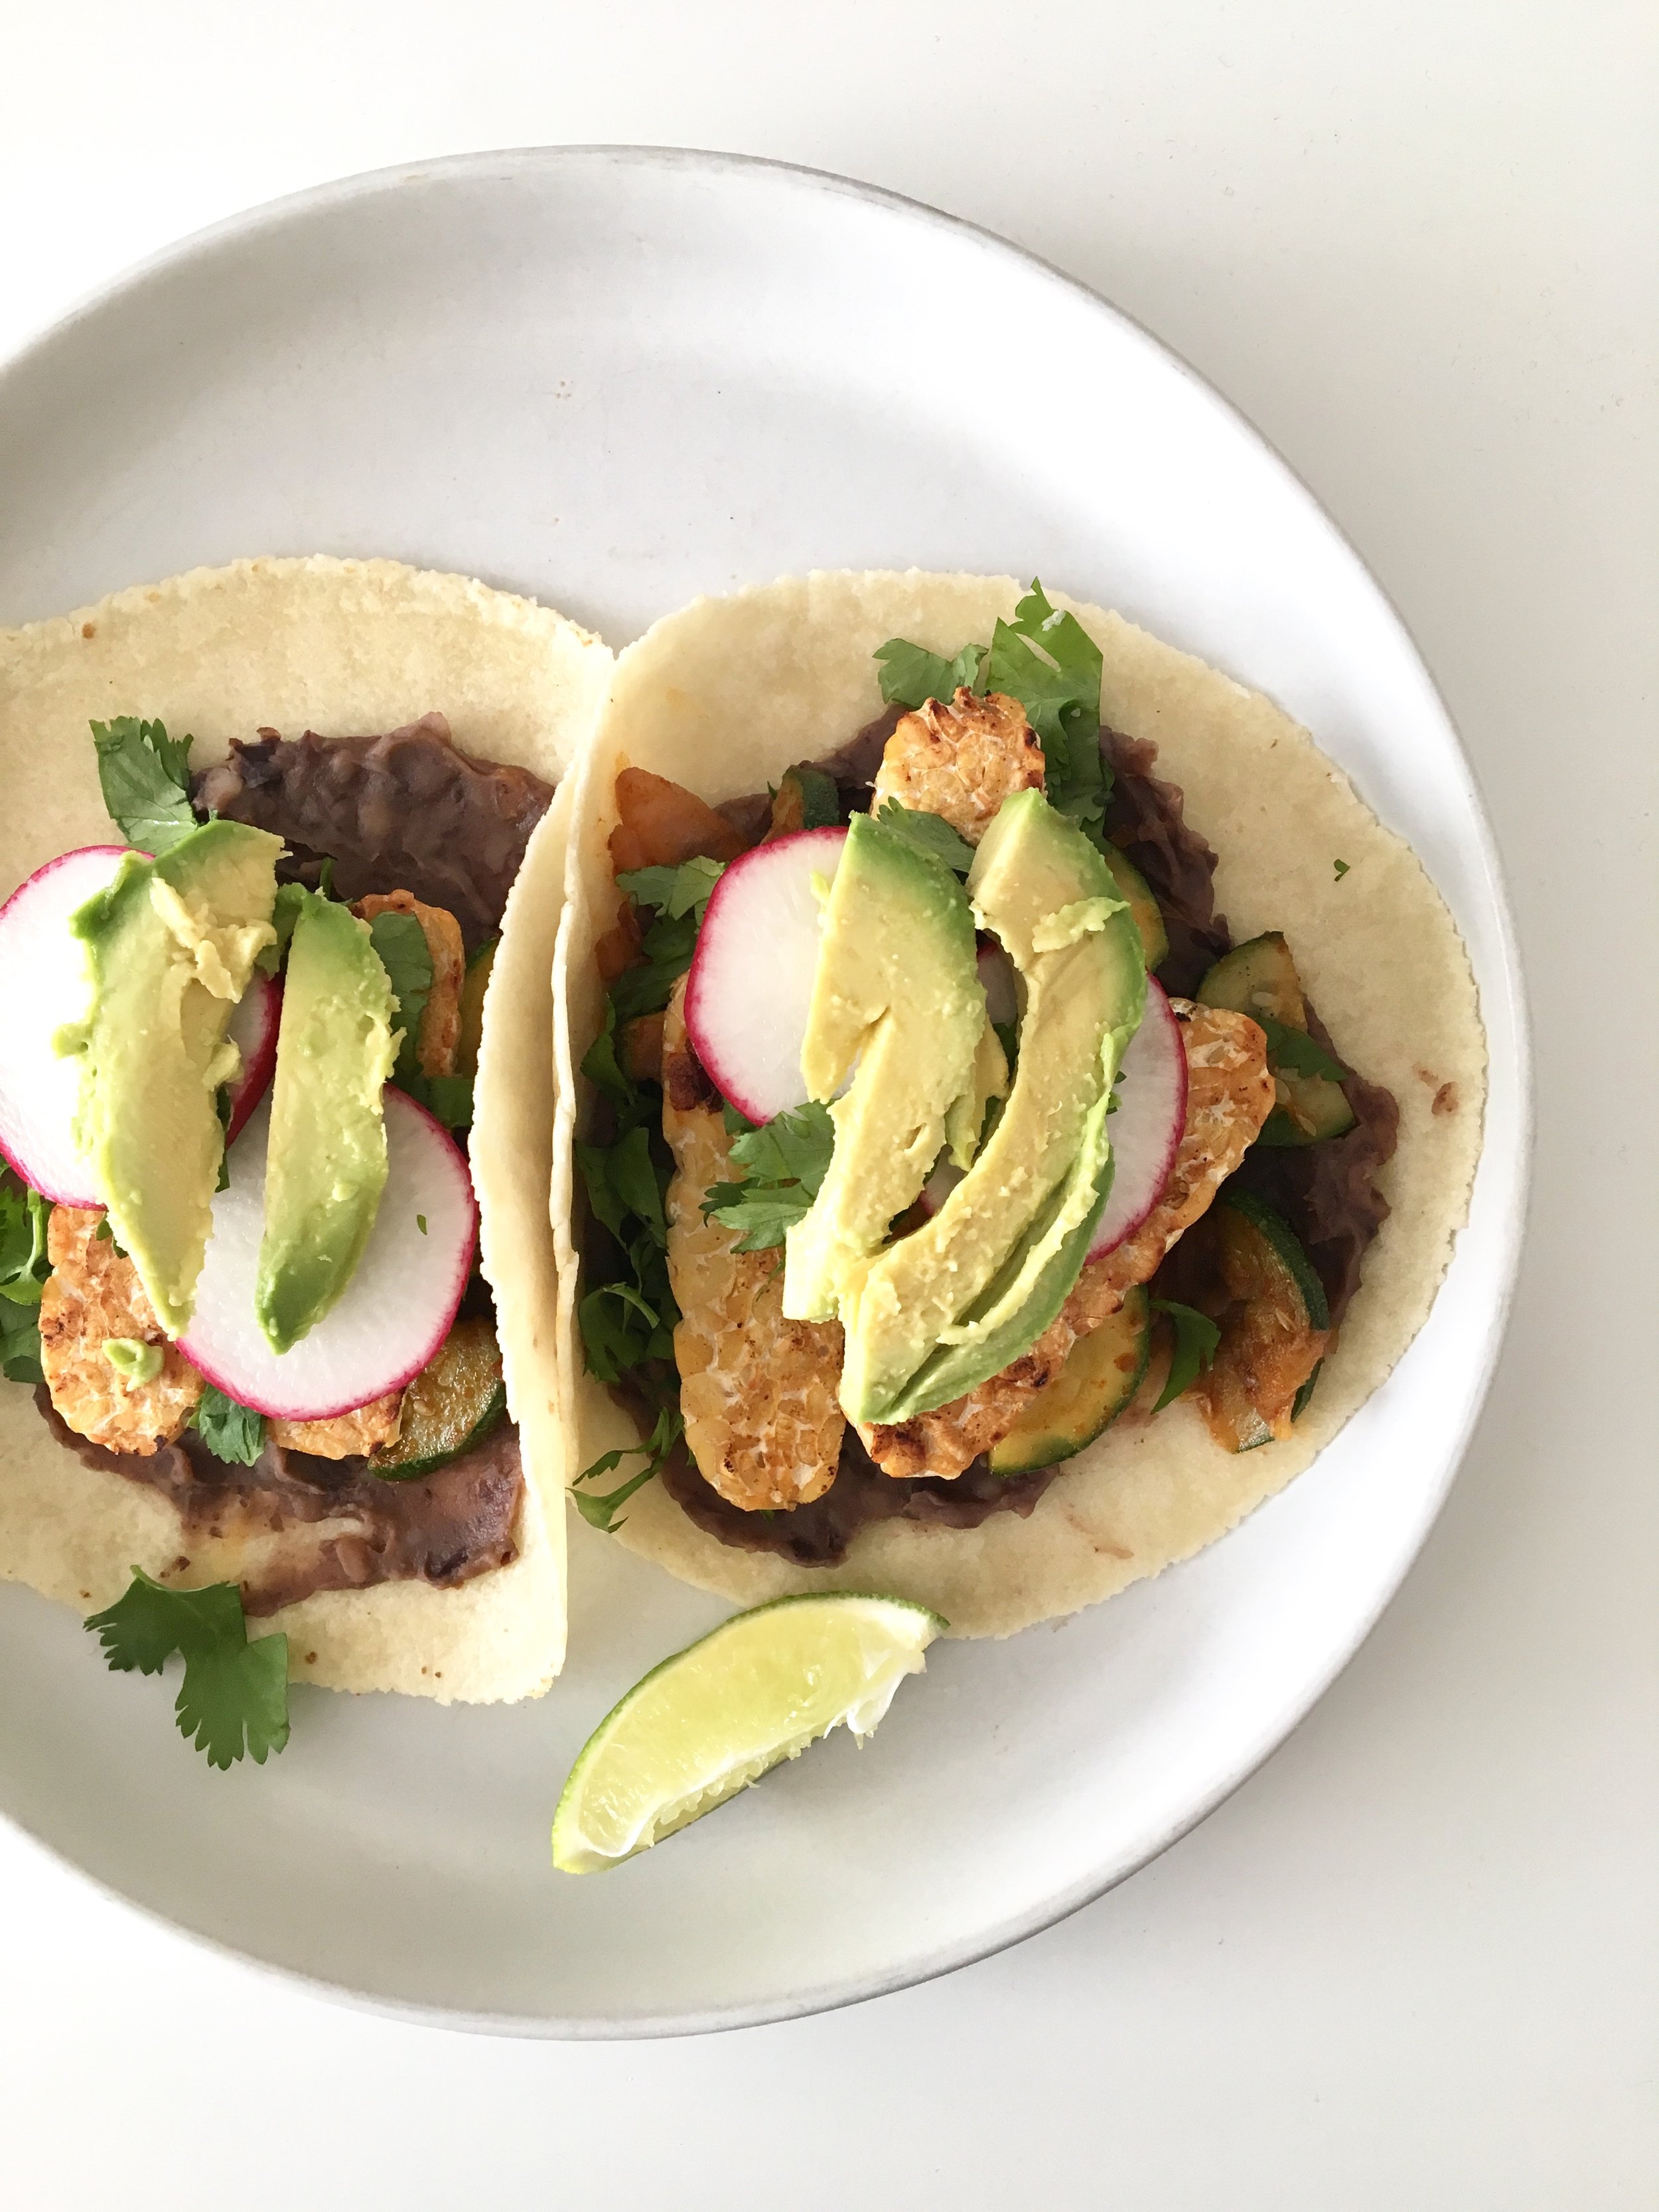
  • Refried black beans (I bought a 15-ounce can refried black beans and what I didn't use, I put into tupperware for meals during the week)

Toppings:

  • Sliced radish
  • Sliced avocado
  • Chopped cilantro
  • Sliced lime

Wraps:

  • Any kind you want! I used 2 Siete almond flour wraps per meal—you can find these at Whole Foods or small health food stores

Method:

In a large skillet or sauté pan over low-medium heat, heat 1 TBS olive oil. Add red onion, zucchini, garlic, 1/2 tsp cumin, 1/2 tsp paprika, and salt. Cook until the onion and zucchini are soft, about 5-7 minutes, depending on the strength of your burner. When the onion and zucchini mixture is cooked (soft and almost caramelized), transfer into a bowl and set aside. This makes about 1 1/2 cups cooked zucchini.

With the pan still over low-medium heat, add the remaining 1 TBS olive oil to the pan. Place tempeh slices in the pan, close to each other but not touching. If it doesn't all fit, no worries, you can repeat the cooking process with remaining tempeh.

Cook on one side for 3-4 minutes until browned, then with a pair of tongs, flip each slice over and cook on the other side for 3-4 minutes until browned. Add remaining 1/2 tsp each of cumin and smoked paprika, and salt to taste. When tempeh is browned on both sides, transfer to a plate and set aside. 

Now it's time to prepare the wraps! Place two wraps on a plate. Spread 1 TBS refried black beans on each wrap, leaving room around the edges. Add as much or as little zucchini mixture on to the wraps as you want, or you can have it on the side. Add 2-3 slices of tempeh to each wrap, and top with sliced radish, avocado, and cilantro. Squeeze wedge of lime over wraps to finish them off!

What's awesome about these wraps is having all of these different components that you can use to make different meals... try breakfast-for-dinner wraps with refried black beans, scrambled eggs, and zucchini; or a deconstructed taco salad with sliced tempeh, refried black beans, avocado, and radishes served over greens. The possibilities really are endless!

Comment

TAGS: ninaknowsfood, plant-based, vegan, dinner, healthy meals, meal prep, weeknightmeals, weekdaymeals, recipetesting, recipedevelopment, howtoadultcookbook, takeout


June 21, 2017

No change, no growth.

by Nina Z


You may have heard the saying, hindsight is 20/20. And of course, it wouldn't be so clear if you didn't have time to reflect on it afterwards. That's exactly what I've been doing these past few months - reflecting - and ready to tackle whatever comes my way.

Let me start at the end of the story: the trip of a lifetime, the trip to cap off the first half of my year that had quite a few bumps in the road. SurfYogaBeer, you gave me exactly what I needed at exactly the right time - the universe is funny that way, you know? Amazing food, amazing views, and even more amazing people contributed to a blissed-out week where I was more present in every moment than I had been in months.

IMG_6475.JPG

Now, back to the real world, where I'm dealing with the ever-present reality of Saturn's return. Yep, Saturn's return, the period of time leading up to when Saturn returns to the same position it was on the day you were born. This period of time marks major transition as you move in to the next phase of your life. Think I'm crazy? Look it up!

What else has changed? A new job, a new apartment... just to name a couple. You may be thinking, Nina this is so much change at once! I don't disagree. It's a TON actually. If I've learned anything over the last few years, it's to be patient with myself, especially during these times of change. I tend to be very impatient and I often have to remind myself that it's going to take time. But I also remind myself that this is such an exciting time, with lots of beautiful and positive things to come.

So what remains true and consistent? My desire to keep up with this blog, and my love for cooking (of course). I've had to start meal prepping to bring lunch to my new job, which has been challenging but has allowed me to get more creative in the kitchen. I've been inspired by Food52's one-pot meals, like these curried coconut lentils. OH MY GOD, YUM. (Note: I added frozen peas and walnuts to mine). Meal prep has also allowed me to have a quick dinner without having to start cooking as soon as I get home. Win-win.

Oh, another thing that's going on? My dream of writing a COOKBOOK with my kickass friend Ilana is FINALLY COMING TRUE.

HELL YEAH, A COOKBOOK. A cookbook for us - the millenials - the ones realizing how incredibly valuable home cooking is and how important it is to have some basic skills, and absolutely delicious recipes, under our belts. We've been thinking about this for years and it's finally starting to happen. We only ask that you remain patient, as we're only at the beginning of planning, which happens to be the most fun... recipe development!

You wanna help test out recipes? Get in line.

Just kidding, there is no line. (Or is there?)

To give you a little taste of what's to come (see what I did there?), I'm going to share an exclusive cookbook recipe with y'all! 

Here's what you'll need to make GRAB-n-GO Protein Balls (makes 10-12, two-bite balls):

  • 1 large banana, mashed
  • â…“ cup almond butter or peanut butter
  • ¾ cup rolled oats (not quick cook!)
  • 1 TBS maple syrup
  • 1 TBS hemp seeds
  • ½ tsp cinnamon
  • 1 TBS dried goji berries (or cranberries, or blueberries)
  • 1 TBS semi sweet or dark chocolate chips, slightly chopped (leave some full pieces)
  • 1 ½ TBS unsweetened coconut flakes (mix in) + 1 cup flakes (reserved for rolling)
  • Pinch of sea salt

Combine all ingredients in mixing bowl. Set aside baking sheet lined with parchment paper.

On a large plate, pour 1 cup of unsweetened coconut flakes. Using a spoon, scoop mixture and roll into 1-inch balls (about 1 TBS worth of mixture). Coat each protein ball with coconut flakes and place on baking sheet. Repeat until mixture is gone.

Refrigerate protein balls for at least 30 minutes; overnight is best. You can also freeze; the texture/consistency won't change that much! Store in an airtight container - will last 3-5 days in the fridge, 1-2 weeks in the freezer.

This is THE perfect snack to grab if you're running late to work, or to pop right before a spin class. Or, just-because you're hungry and want something packed with protein, fiber, and healthier sugars. 

It's good to be back, in more ways than one. Ciao (for now)!

Comment

TAGS: ninaknowsfood, travel, italy, surfyogabeer, mealprep, cooking, cookbook, vegan, dairy-free, snack, healthytreat, balance, howtoadultcookbook, recipedevelopment, recipetesting, weeknightmeals


August 24, 2014

End-of-Summer Blueberry Tart

by Nina Z


If you love blueberries as much as I do, then this tart will knock your socks off. Every bite is saturated with bursting blueberries and flaky, sweet crust.

Inspired by the lovely Baer family recipe, I made this tart my own by removing the dairy- and gluten-filled ingredients and making my own additions and substitutions.

Here's what you'll need to make one beautiful tart (serves 8-10):

  • 9" or 10" springform pan (these have removable centers)
  • Crust:
    • 1 1/2 cups gluten-free flour (I used Bob's Red Mill) - or flour of your choice
    • 1/8 tsp salt
    • 3 T sugar
    • 1/2 cup Earth Balance non-dairy spread
    • 1 TBS apple cider vinegar
    • 1 tsp lemon zest
  • Filling:
    • 2 pints fresh blueberries
    • 3 TBS gluten-free flour - or flour of your choice
    • 1 tsp cinnamon
    • 3/4 cup sugar
    • 1 tsp lemon zest
  • After baking:
    • 1 to 2 pints fresh blueberries

Pre-heat oven to 400 degrees F.

Start with the crust:
Grease pan thoroughly with Earth Balance spread. In a food processor, combine flour, salt, sugar and lemon zest and pulse until combined. Add Earth Balance spread and vinegar, and pulse until combined. There should be pebble-sized pieces formed (see below)

Pour flour mixture into greased pan and press with your hands to make an even crust.

Next, the filling:
In a large mixing bowl, combine 2 pints of berries with flour, cinnamon, sugar and lemon zest. Toss with two large spoons to coat the blueberries as much as you can. Pour berry mixture over the crust. Shake the pan gently to spread the mixture evenly over the crust. There will be quite a bit of flour and sugar not coated onto the berries.

Place the tart on lowest shelf of the oven and bake for 1 hour, or until the berries bubble and the flour has begun to brown slightly.

Remove tart from oven and immediately sprinkle remaining 1 or 2 pints of berries on top (I used a little over 1 pint). Allow to cool completely before removing outside rim of the pan.

Finally, prepare to have purple fingers trying to get the perfect piece out of the pan. I suggest cooling the tart in the fridge to allow the filling to completely set. This will make cutting pieces easier!

Here's to blueberry-stained hands and teeth: an indication that you're making the most out of the end of this season!

Comment

TAGS: gluten-free, vegan, dairy-free, dessert, homemade, blueberries, summer


June 30, 2014

Strawberry Rhubarb & Basil Oat Crumble

by Nina Z


DSC_0045.JPG
DSC_0045.JPG

Summer is all about the berries. Strawberries first, then blueberries, and last but not least, raspberries towards the end of the summer. While strawberries are not my favorite, I never pass up an opportunity to go berry picking.

photo (2).JPG

If you don't want to make jam, and you don't want to eat pancakes filled with fruit until you hate pancakes, then consider making crumble! Easy to make, easily frozen to eat another time, and just plain delicious. It's a no-brainer.

Here's what you'll need to make 20-24 small bars / to serve a crowd / to treat co-workers!:

  • For the strawberry-rhubarb-basil filling:
    • 3/4 cup chopped rhubarb
    • 2 1/2 cups chopped strawberries
    • 1/2 cup water
    • 2 tsp vanilla
    • 2 TBS maple syrup
    • 2 tsp lemon juice
    • 1 1/2 TBS finely chopped basil
  • For the crumble:
    • 3 cups oat flour
    • 3 cups old-fashioned oats
    • 1/2 cup white or raw sugar
    • 1/3 cup packed brown sugar
    • 2 tsp baking soda
    • 1 tsp salt
    • 1 1/3 cup coconut oil, melted/liquified

Preheat the oven to 350 F. In a small sauce pan over medium heat, add in all filling ingredients except for the strawberries. Bring to a boil, lower the heat to allow the filling to simmer for 10-15 minutes, or until the rhubarb has softened. Add in the strawberries, bring back to a boil, then lower the heat once more to allow to simmer for an additional 15-20 minutes, or until the filling has thickened. Once thickened, take off the heat and set aside to cool slightly.

DSC_0007.JPG

In a large mixing bowl, combine all dry ingredients except for the coconut oil. Once combined, add in the oil and mix until all the flour has been incorporated and looks uniform.

How you bake the crumble is up to you - you can use a shallow baking sheet, or you can use two brownie pans (usually 9x13). [If you only use half this recipe, then you'll only need one brownie pan.] Spray the dishes with non-stick cooking spray until thoroughly coated. Spread about 1/4 of the crumble mixture on the bottom of the dish, patting down with your hands until you have a thin, uniform layer. Spoon as much filling mixture as you want over the crumble, spreading evenly. Take another 1/4 of the crumble mixture and sprinkle evenly across the top. Repeat with the rest of your crumble mixture

You may not use all of the filling - that's OK! I used the extra filling as a sauce to pour over the crumble afterwards!

Bake for 30 minutes, or until the crumble has turned slightly golden. Allow to cool before serving, especially if you want to serve the crumble in bar-form, because it falls apart!

Did I mention they're vegan and gluten-free? What are you waiting for!? Get out in the sunshine, pick you own berries, and bake these scrumptious treats!

1 Comment

TAGS: vegan, gluten-free, strawberries, dessert, dairy-free


June 30, 2014

Morning Treats: Banana Oat Breakfast Muffins & "Breakfast" Cookies

by Nina Z


photo 1-1.JPG
photo 1-1.JPG

You'll go bananas over these muffins. Seriously, bananas.

I'm always trying to find a way to make breakfast more interesting. I love my whole wheat toast with peanut butter and banana, and I love my overnight oats with chia seeds and fresh fruit. The next logical step? Combine them! High in fiber, omega-3's and potassium, these muffins pack a nutritional punch. 

Here's what you'll need to make Banana Oat Breakfast Muffins (makes 10-12 large muffins):

  • 2 1/2 cups old fashioned oats
  • 1 tsp baking powder
  • 1 1/2 tsp cinnamon
  • 1 TBS chia seeds
  • 1/4 tsp salt
  • 3 medium ripe bananas, mashed (about 1 1/2 - 2 cups)
  • 2 egg whites
  • 2 tsp vanilla extract
  • 1 cup unsweetened almond milk - vanilla is great!

Preheat oven to 350 degrees F. In a large mixing bowl, combine oats, baking powder, cinnamon, chia seeds and salt. In a separate mixing bowl, combine bananas, egg whites, vanilla extra and almond milk. Combine the wet ingredients into the dry, mixing thoroughly with a spatula until evenly combined.

Line muffin tins with cupcake cups or spray well with non-stick cooking spray. Fill muffin cups until almost full - they will not rise much. Bake for 30-35 minutes, or until the muffin is completely set in the middle. Allow the muffins to cool before removing from the muffin tins, or serve warm with some peanut butter and extra chia seeds! A giant cup of coffee makes this breakfast complete and satisfying.

Breakfast & snack tip: Make these muffins Sunday evening, and you'll have a quick, easy Monday morning breakfast. Grab one for a mid-day snack and serve with some yogurt and fruit.

Are you checking to see if you have the ingredients? Get creative - throw some blueberries, nuts or flax seed in there!

Are you checking to see if you have the ingredients? Get creative - throw some blueberries, nuts or flax seed in there!

With no added sugar, these breakfast muffins are great for those watching your sugar intake. If you like to have a more indulgent breakfast, which I sometimes do, then this next recipe is for you. Having something sweet in the morning may curb your afternoon sugar craving. Personally, I can have chocolate any time of day, and I will usually reach for any dark chocolate or raw cacao nibs.

While many say that chocolate "can help you lose weight," or "is healthy for you," it's all up to how it makes you feel. If you're going to have sweets, do it right, and skip the artificial sweeteners.

These cookies were not originally meant to be for breakfast, but they definitely could be. If you're not one for a big breakfast, having a small treat loaded with whole grains, protein and antioxidants is the perfect solution.

photo 2 (2).jpg

Here's what you'll need for my Peanut Butter & Cherry Chocolate Chip Cookies (makes 12-15 small cookies):

  • 1 cup whole wheat flour (or 1 1/2 cups old fashioned oats)
  • 1/2 tsp baking powder
  • 1/2 tsp salt
  • 1 tsp vanilla extract
  • 1/4 cup sugar
  • 4 TBS peanut butter - creamy or crunchy, your choice!
  • 1 cup unsweetened applesauce
  • 1/3 cup roughly-chopped dark chocolate or 1/2 cup dark chocolate chips
  • 1/3 cup chopped frozen cherries

Preheat the oven to 350 degrees F. In a large mixing bowl, combine flour (or oats), baking powder and salt. Mix until thoroughly combined.

Add in vanilla, sugar, peanut butter and applesauce and mix well. Fold in chocolate and cherries gently, as to not break up the cherries too much. 

Line baking sheets with parchment paper. Scoop cookies out onto the baking sheet with a tablespoon. If you use a large ice cream scoop, you will yield 8-10 large cookies. Bake for 10-12 minutes, or until the cookies are completely set and golden in color. Allow to cool for 5 minutes before serving - they are awesome served warm.

Creative variations: chopped nuts, 1 medium ripe mashed banana (add more flour or oats if you do this), cinnamon, chopped crystallized ginger, and/or chia seeds

Make your mornings more delicious - have dessert first. 


*Learn more from the blogs that inspired these breakfast treats: muffins & cookies

Comment

TAGS: vegan, gluten-free, muffins, cookies, banana, oats, breakfast


Powered by Squarespace 6